
 Contents
*Note : You Can Test Payza Transactions By Changing The Values of Routine URL, Payza Email, IPN Security Code and API Password As Per Your Sandbox Account.
Routine URL Should Be 'https://secure.payza.eu/checkout' for Live Transactions.
You Need to Create an API(For Masspay) And Setup Alert URL(Necessary For Add Fund to Work) in Your Payza Account.
- To Create an API, just follow these steps
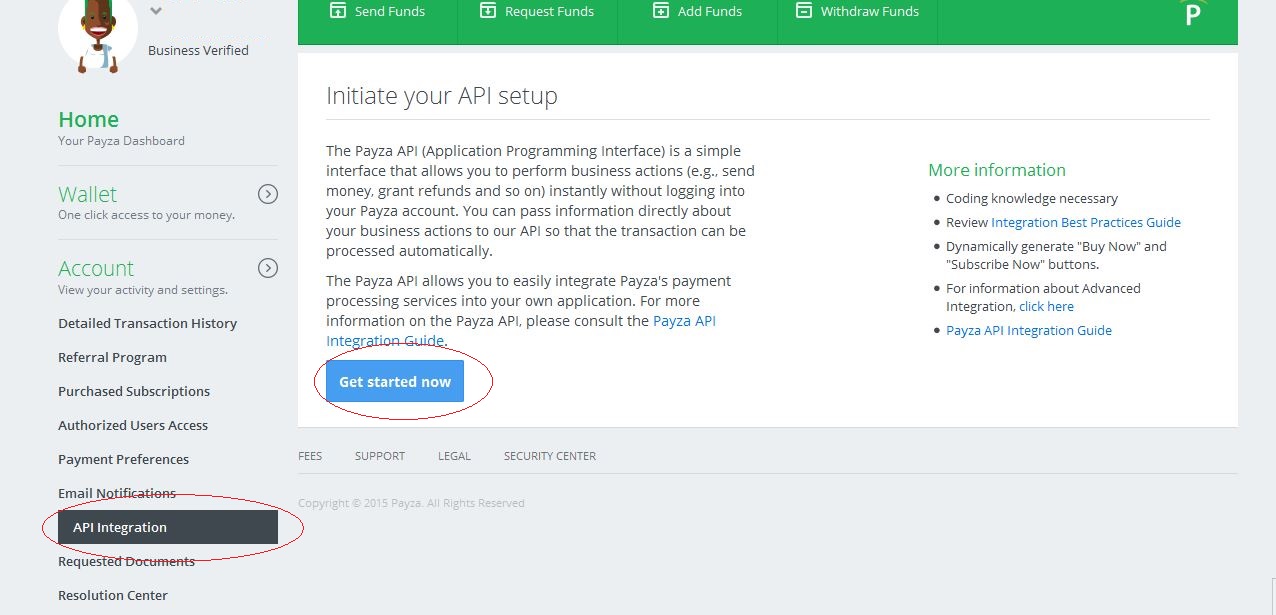
- Login to your Payza account.
- Click on "Account".
- Click on API Integration
- Click on Get Started Now.
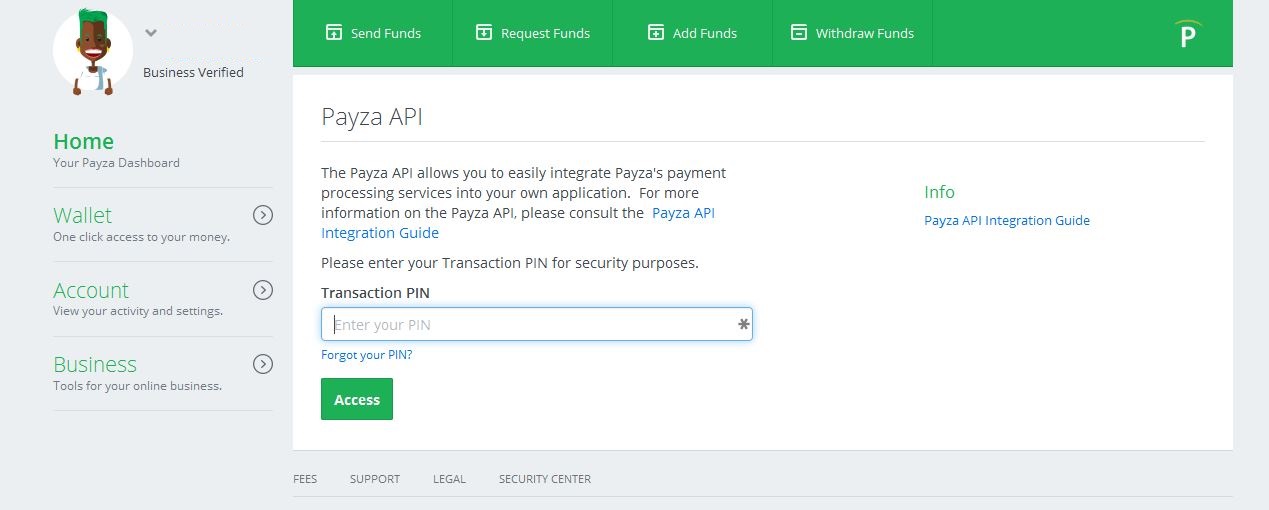
- Enter your Transaction PIN and Click on Access.
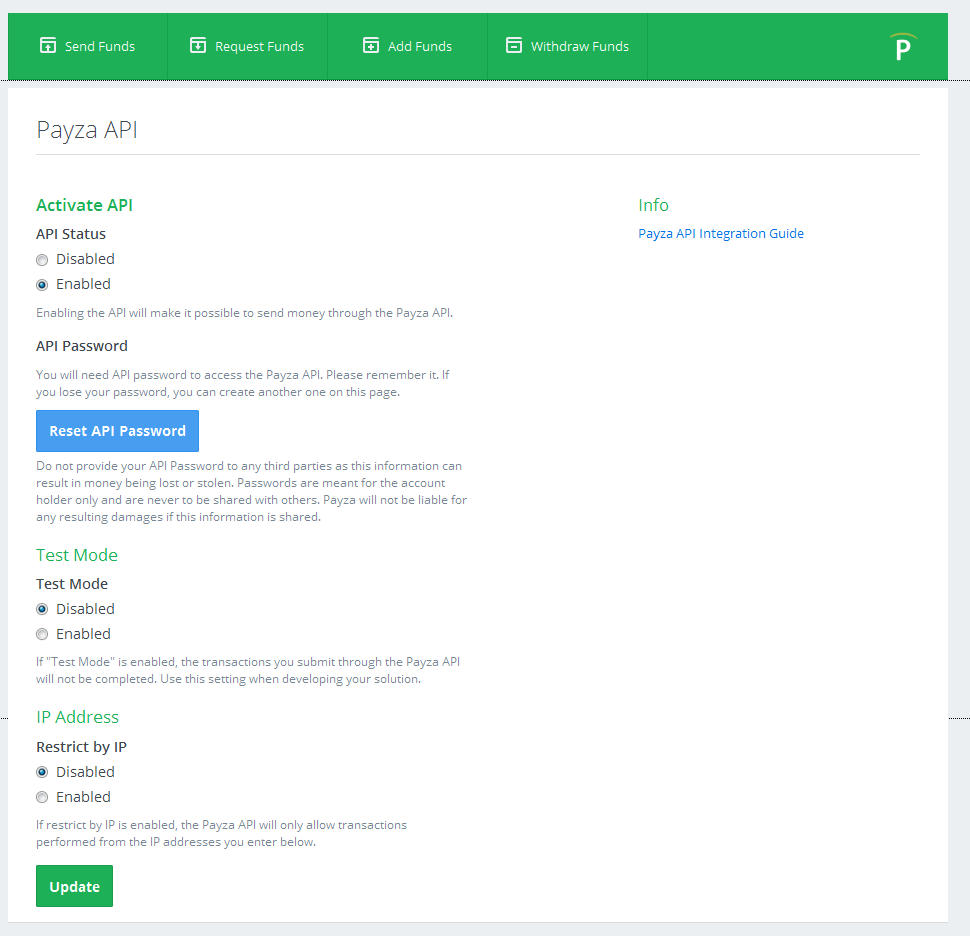
- Click on Enabled Under Activate API Option.
- Note Down The Newly Generated API Password and Specify it Above.
Note : Do Not Enable Test Mode As Many Changes Are Needed For Testing And Its For Developers. Restrict By IP If You Are Going Make Payment Only From One IP Address. Payment Wont Be Possible From Other IP Addresses In That Case.
- Click on Update button.
- To Setup Your Alert URL, Just Follow These Steps
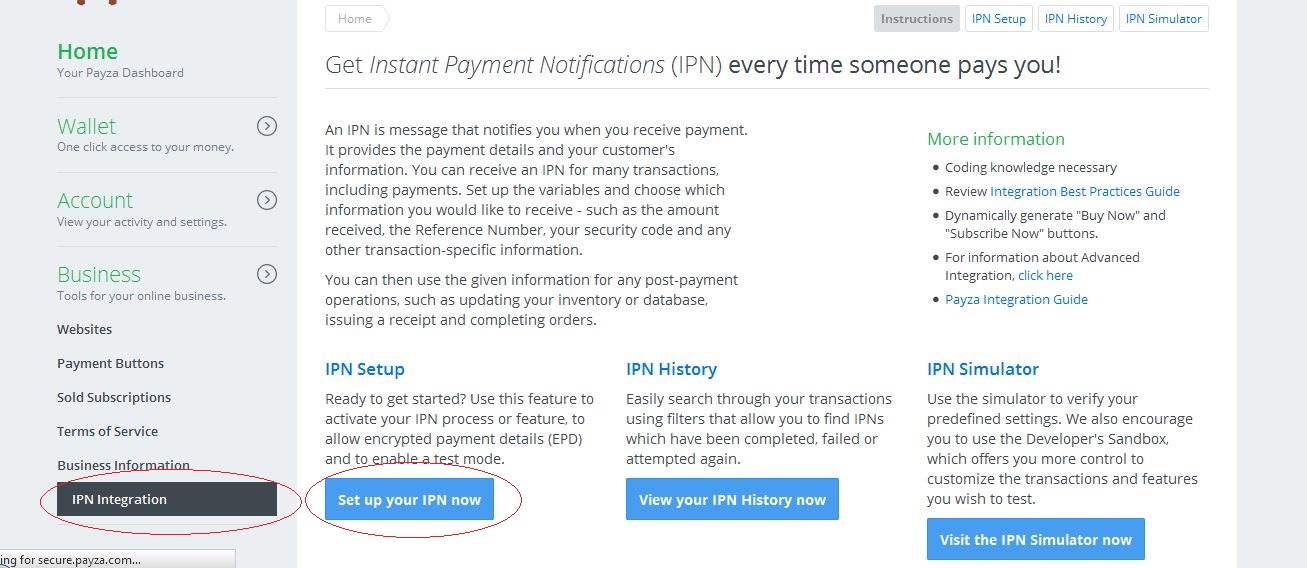
- Login to Your Payza Account.
- Click on "Business".
- Click on IPN Integration
- Click on IPN setup.
- Enter your Transaction PIN and Click on Access.
- Click on The Edit Icon For The Respective Business Profile.
Note : This is For Accounts With Multiple Business Profiles Only. Ignore This Step if You Have Only One Business Profile in Your Account.
- Enter the information :
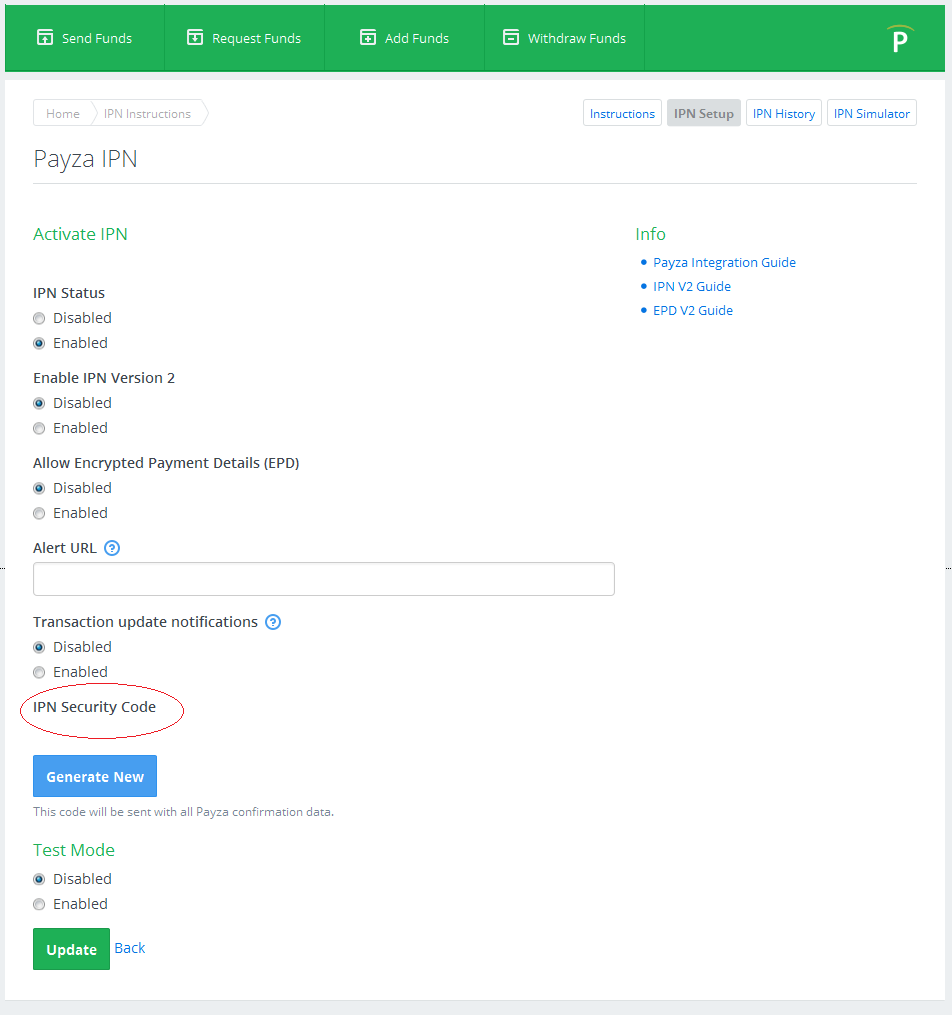
- For IPN Status, select Enabled.
Note : Do Not Enable IPN Version 2 OR Allow Encrypted Payment Details (EPD) And Keep Test Mode Disabled.
- For Alert URL, Enter the URL - [YOUR SITE URL]/payzanotify/index
- For IPN Status, select Enabled.
- Note Down The IPN Security Code And Specify It Above In The Respective Field.
Note : Enable Test Mode and Set Routine URL to 'https://sandbox.payza.com/sandbox/payprocess.aspx' for Test Transactions.
- Click on Update button.

*Note :
Please Remember You Need To Get Website Approval From Payza To Receive Or Make Payment Via Website. Please Make Sure To Register Your Website With Payza By Logging Into Your Account And Select Business/Websites.
If You Are Having Multiple Businesses in Your Payza Account, Your Payza Email That You Specify Above Must Be The Email Address of The Respective Business That You Have Associated With This Website And Not Necessarily The Account Email That You Use While Logging in.
Routine URL Should Be 'https://solidtrustpay.com/handle.php' for Live Transactions.
You Need to Create an API(For Masspay And Add Fund Both) in Your SolidTrustPay Account.
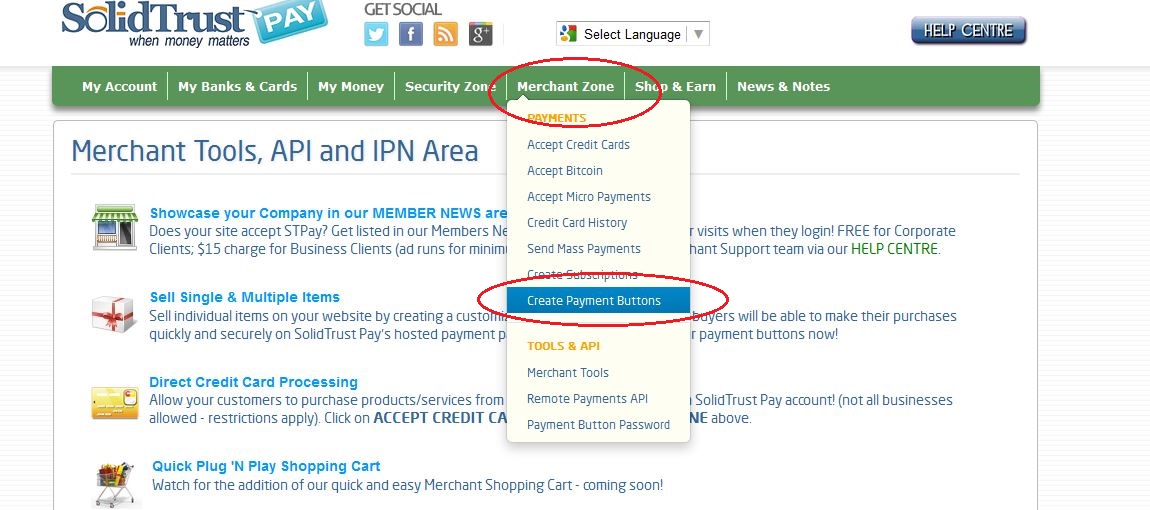
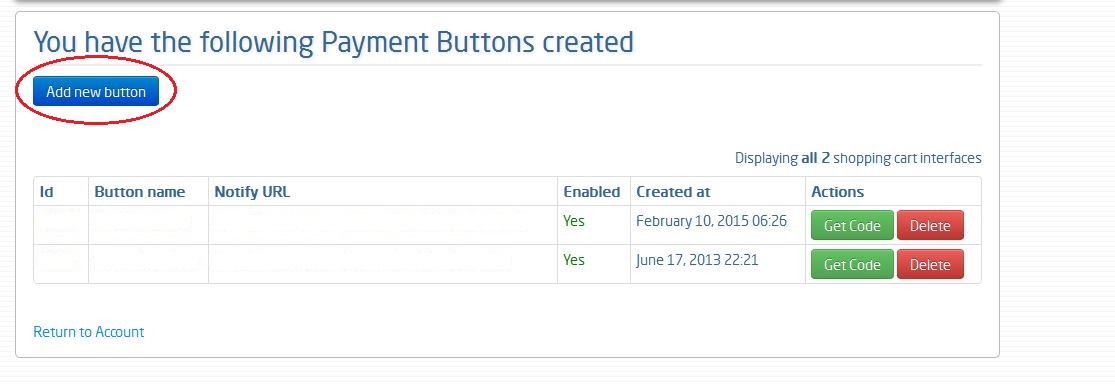
- To Create a Button, Just Follow These Steps
- Login to your Solid Trust Pay account.
- Click on Create Payment Buttons Under Merchant Zone Menu.
- Click on Add a New Button.
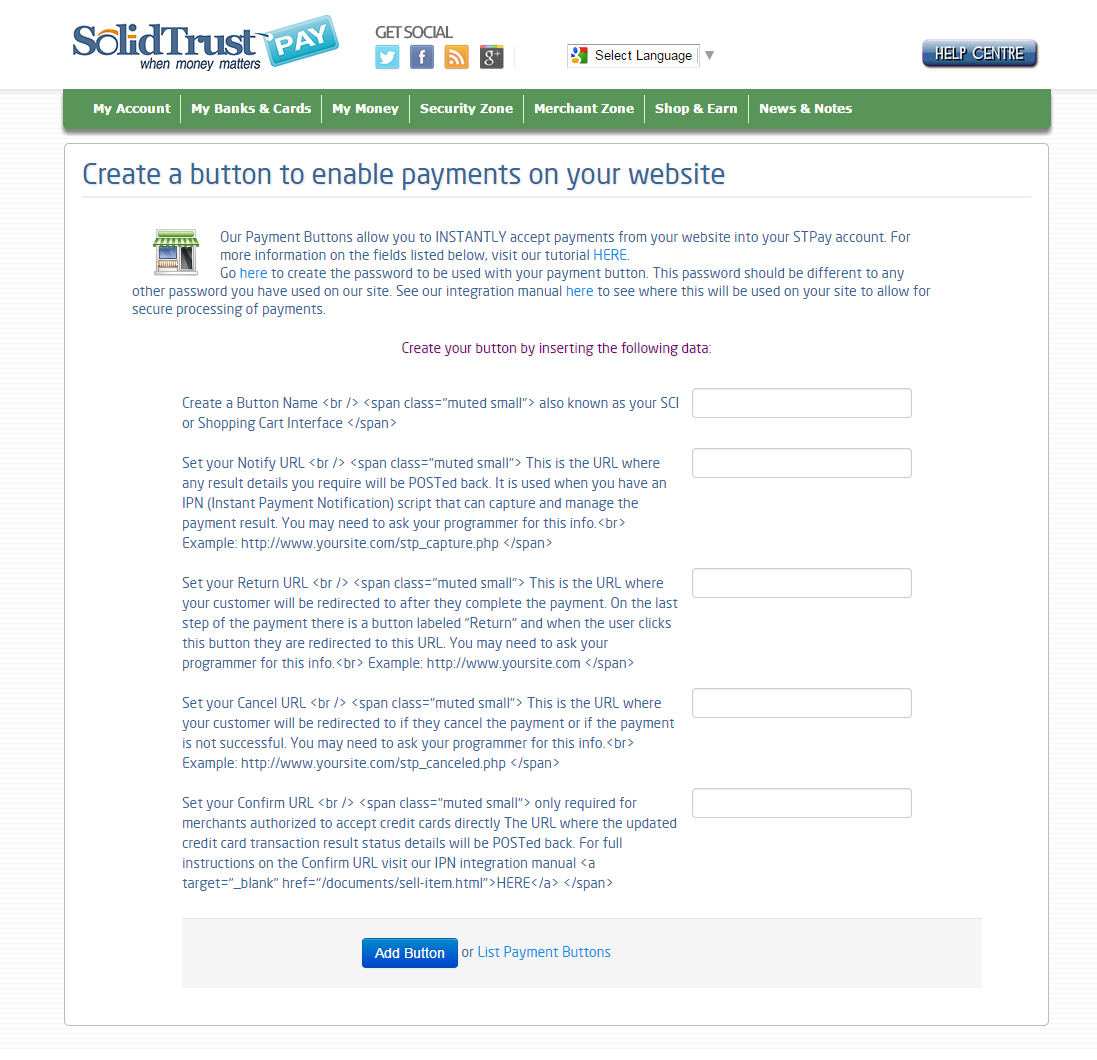
- Specify Any Name For The Button Name.
- Set The Notify URL to - [YOUR SITE URL]/solidtrustnotify/index
- Set The Return URL to - [YOUR SITE URL]/thankyou/addfund/done
- Set The Cancel URL to - [YOUR SITE URL]/thankyou/addfund/cancel
- Click on Add Button.
- Specify Your Button Name Above.
*Note : You Need To Wait Till Your Button Get Approved From STP. Also Create Button Password For Your Button.
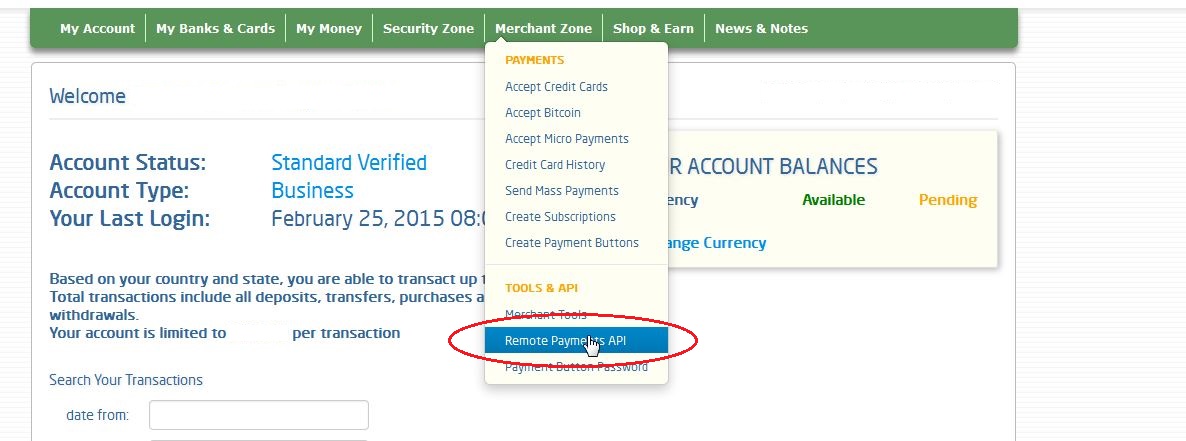
- To Create an API, Just Follow These Steps
- Login to your Solid Trust account.
- Click on Create Remote Payment API Under Merchant Zone Menu.
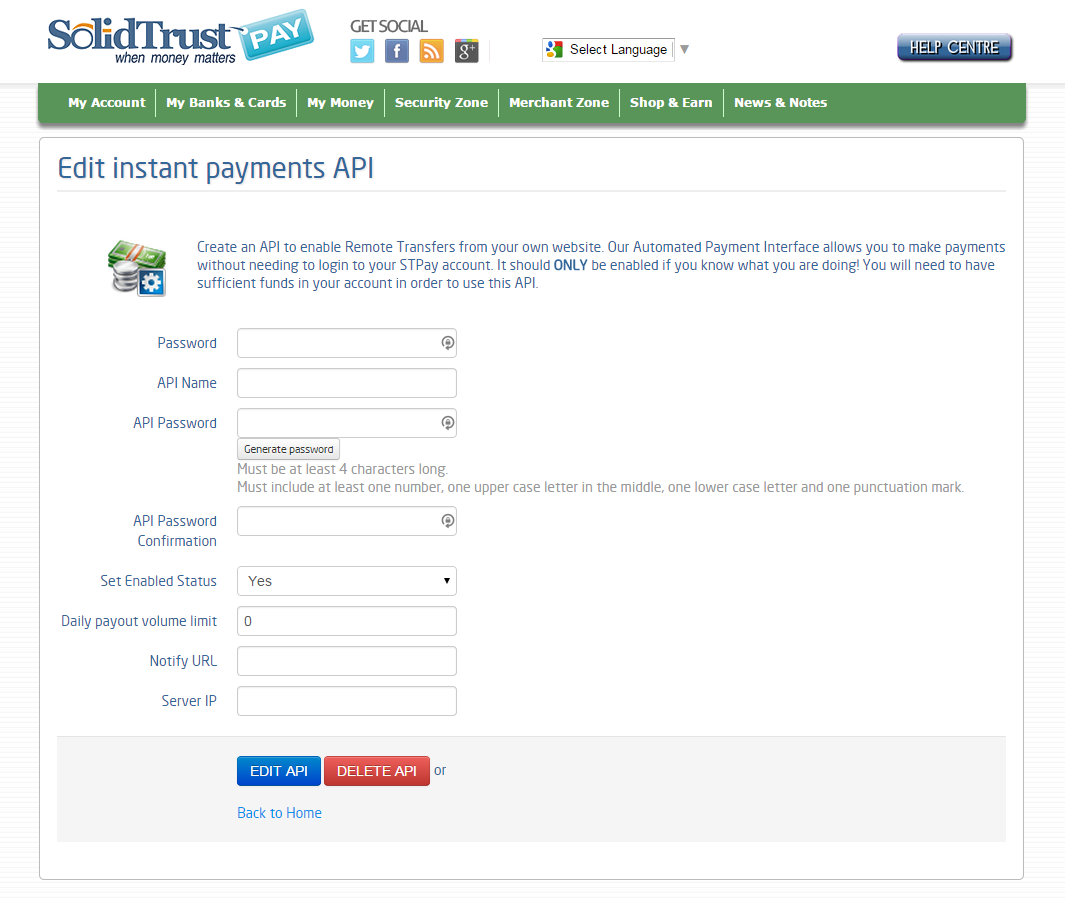
- Specify Any Name and Password For The API.
- Enable Your API by Selecting YES.
- Set a Daily Payout Limit If You Wish.
- Set The Notify URL to - [YOUR SITE URL]/solidtrustnotify/index
- Specify Your Server IP Address.
- Click on Add API button.
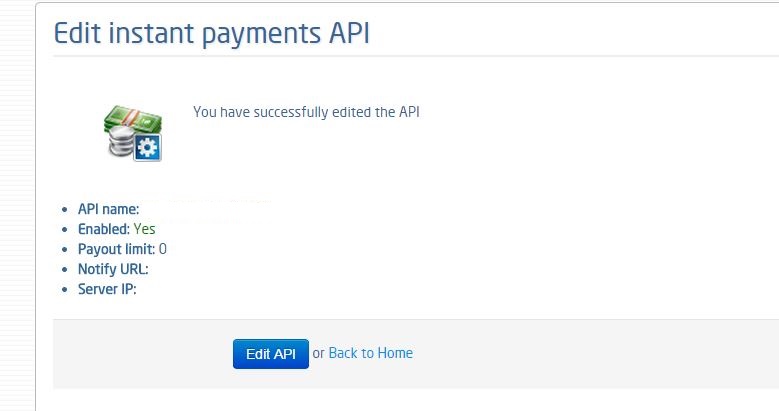
- Specify Your API Name and Password Above.
You Also Need to Specify The Secondary Password/Button Password of Your STP Account Above.
Note : You Need To Set The Button Password In Adminpane In Field Name 'Secondary Password/Button Password'.
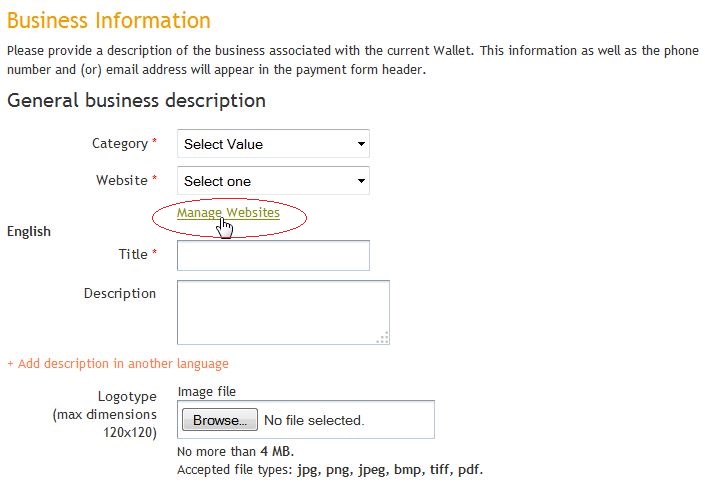
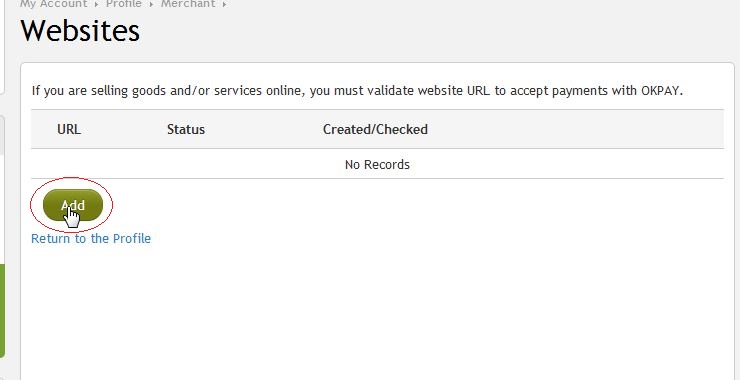
You Need to Verify Your Okpay Merchant Account.
- To Add Your Website to The OkPay Account, Just Follow These Steps
- Login to your OkPay account.
- Click On "Wallet Setting Icon".
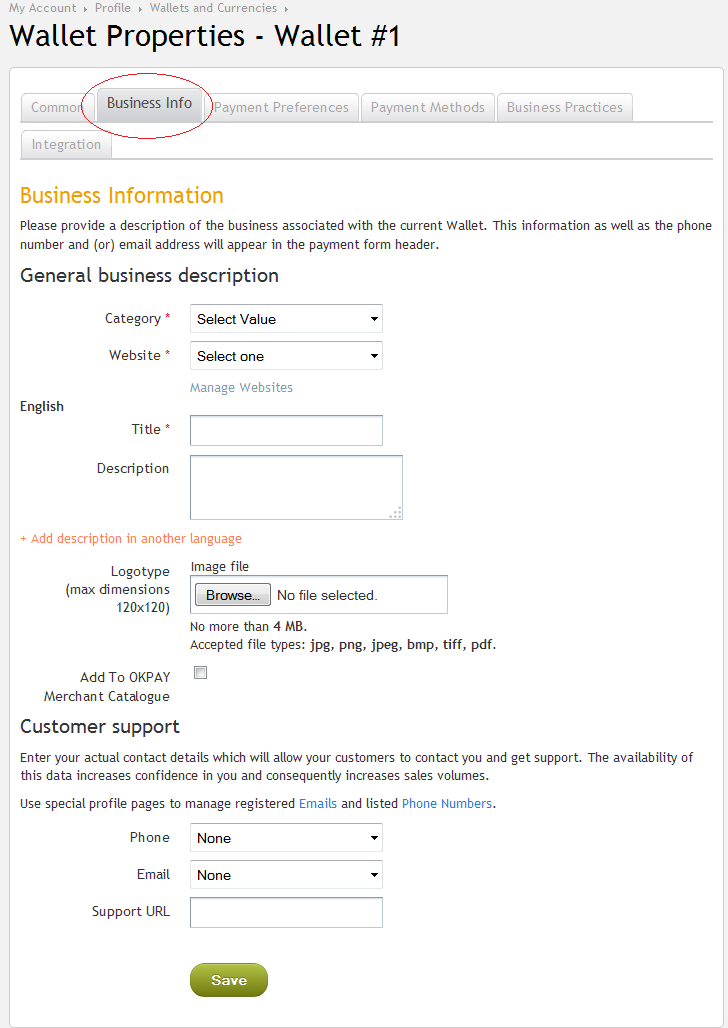
- Click On Business Info Option.
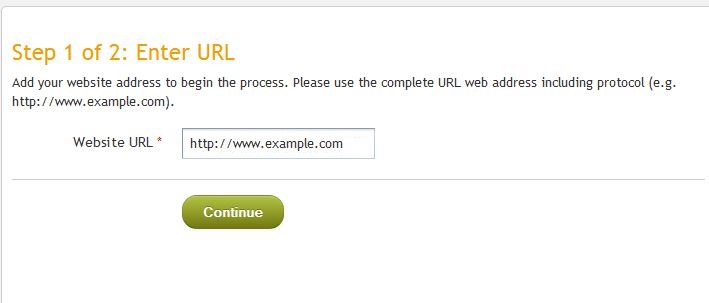
- Click on Manage Website.
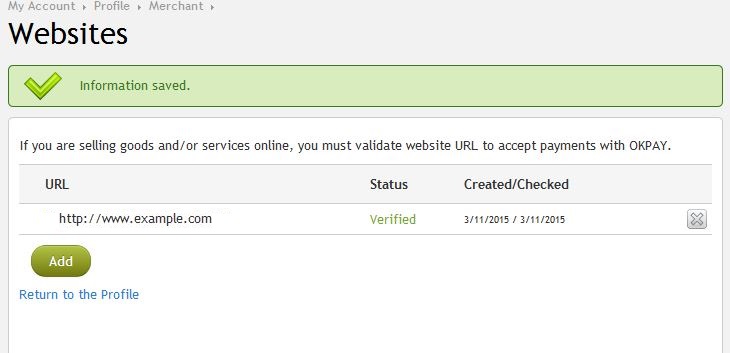
- Specify The Website URL.
- Upload FILE_NAME.txt File to /app/webroot/ Directory. The FILE_NAME Will be Suggested by Perfect Money.
- Click On Verify button.
- Add Other Details Like Description, Website Logo.
- Click On Save button.
- Click On Integration Option.
- Specify Success URL - [YOUR SITE URL]/thankyou/addfund/done
- Specify Fail URL - [YOUR SITE URL]/thankyou/addfund/cancel
- Specify Notification URL - [YOUR SITE URL]/okpaynotify/index
- Check The Enable IPN Checkbox.
- Click On Save button.


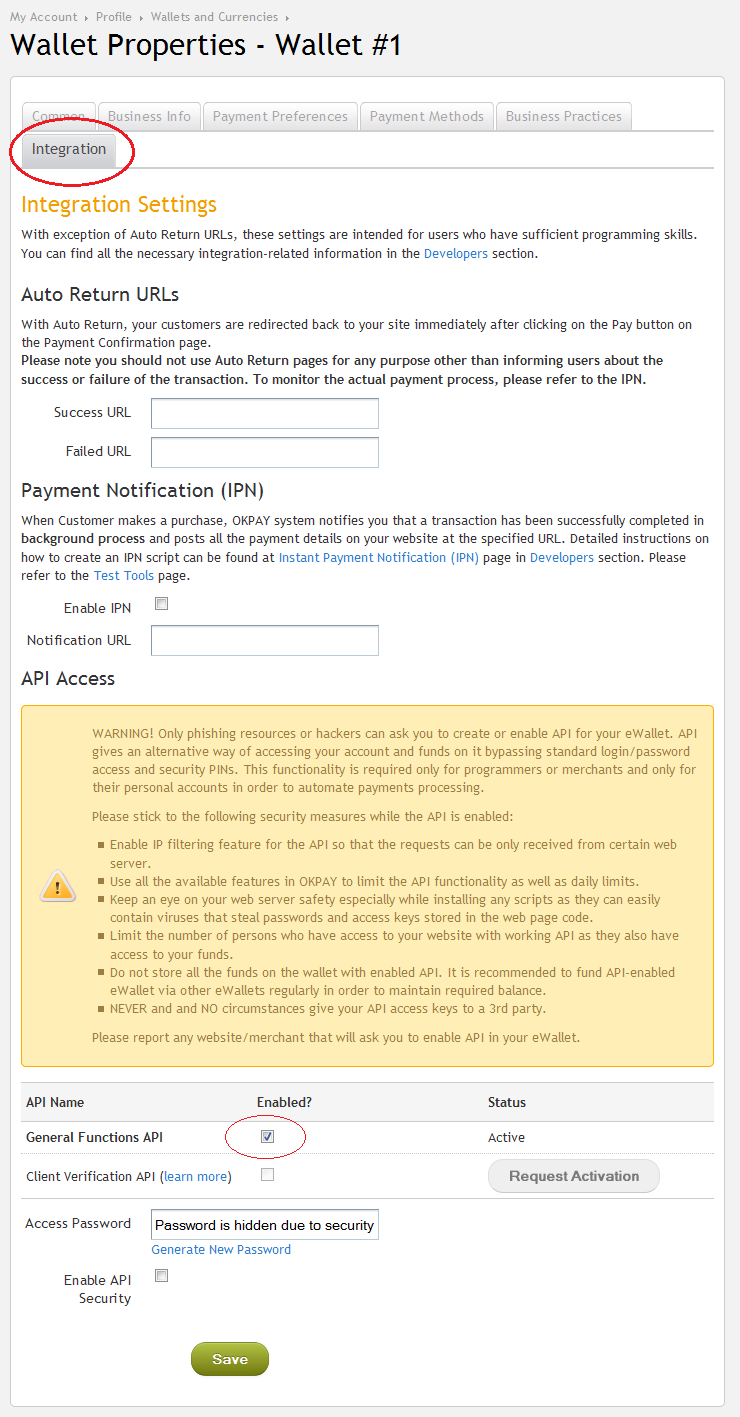
- To Create an API, Just Follow These Steps
- Login to your OkPay account.
- Click On "Wallet Setting Icon"
- Click On Integration Option.
- Check The Enable API Checkbox.
- Specify The Access Password For API.
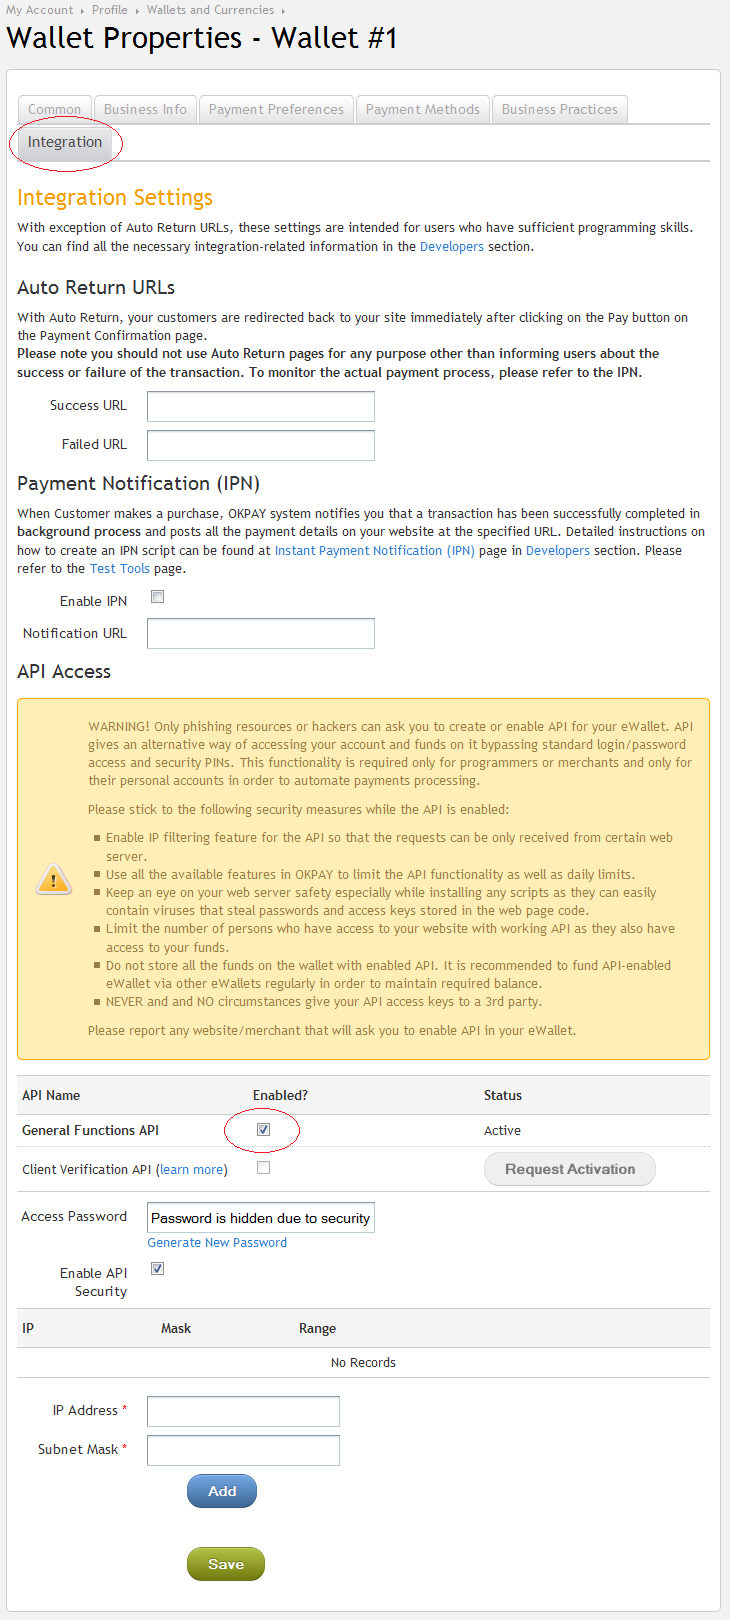
- If You Wish To Enable API Security Through Okpay Then Check The Enable API Security checkbox.
- Specify Your Server IP Address.
- Specify Subnet Mask
- Okpay Merchant Account Details
- Specify Routine URL - https://www.okpay.com/process.html.
- Specify Wallet ID - Your Wallet ID (ex. Ok121212)
- API Access Password - Your Wallet API Access Password.
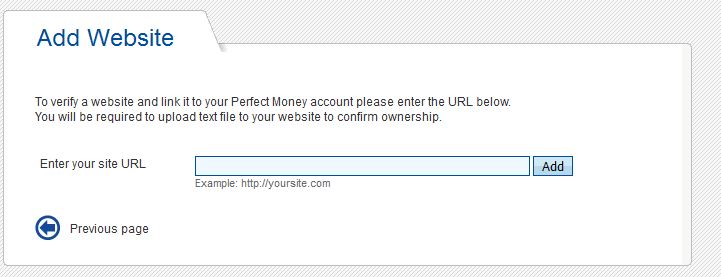
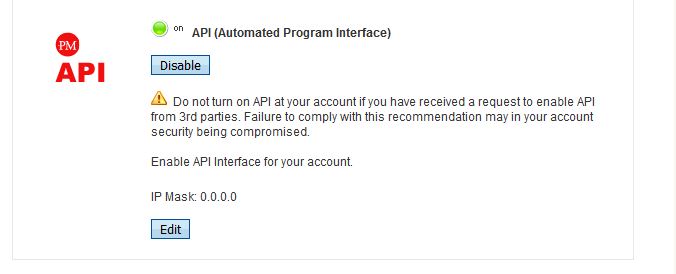
You Need to Add Your Website(A Must Step), Create an API(For Masspay And Add Fund Both) and Specify Your Perfect Money Account Details Above.
- To Add Your Website to The Perfect Money Account, Just Follow These Steps
- Login to your Perfect Money account.
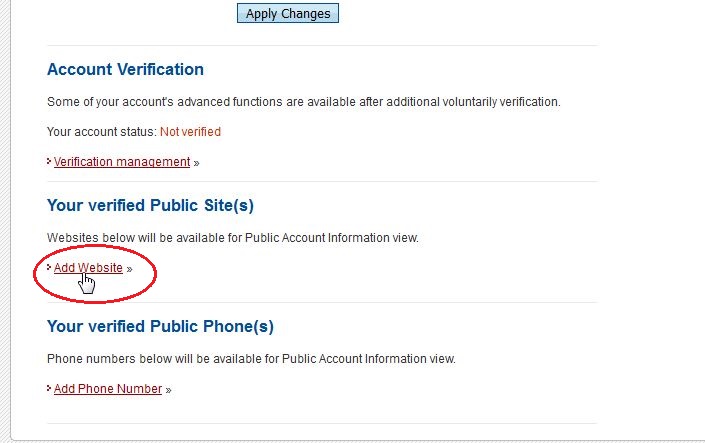
- Click On "Settings".
- Click on Add Website Under Your verified Public Site(s) Option.
- Specify The Name Your Website.
- Click on Add button.
- Upload FILE_NAME.txt File to /app/webroot/ Directory. The FILE_NAME Will be Suggested by Perfect Money.

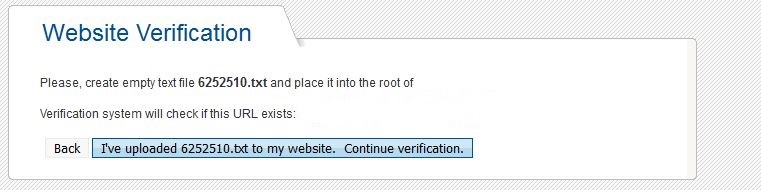

Note : Once You Add Your Website In PerfectMoney Account, You Need To Wait Till PM Approves Your Website.
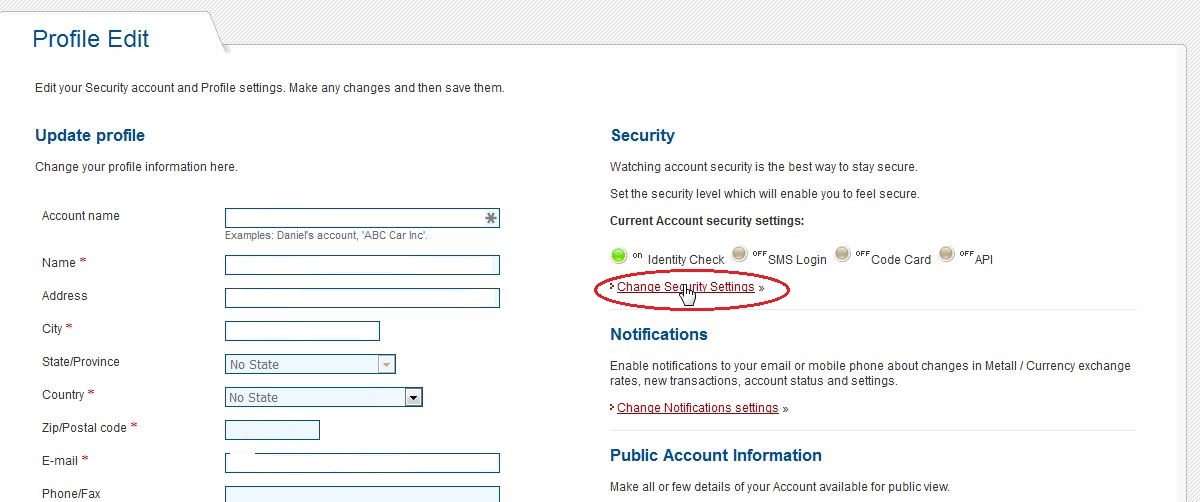
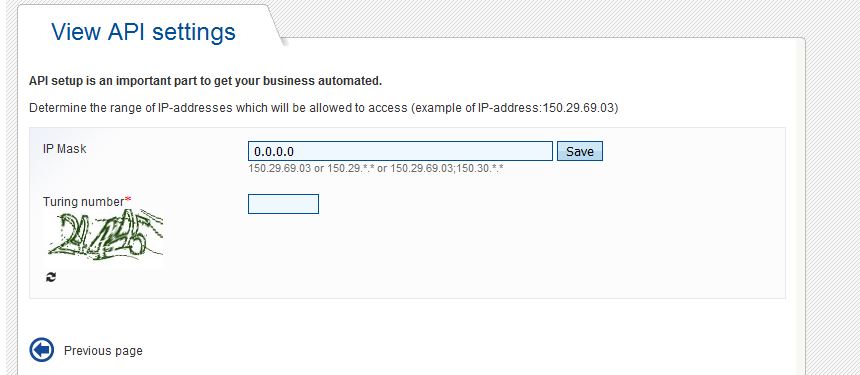
- To Create an API, Just Follow These Steps
- Login to your Perfect Money account.
- Click On "Settings".
- Click On Change Security Settings.
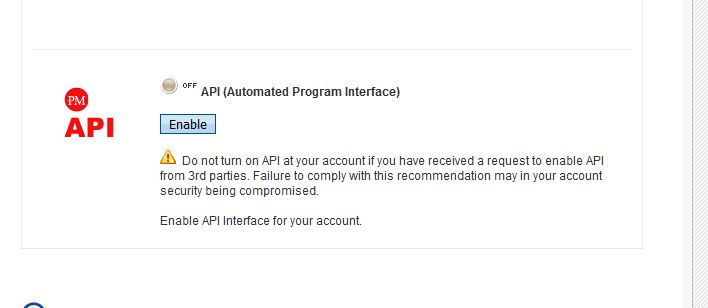
- Go to API Option.
- Click on Enable button.
- Click on Edit button.
- Specify Your IP Address.
- Click on Save button.

- Perfect Money Account Details
- Specify Routine URL - https://perfectmoney.is/api/step1.asp.
- Specify Payee Account - Your USD Account
- Specify Member Id - Your Perfect Money Member Id.
- Specify Account Password - Your Perfect Money Account Password.
- Select Payee Account - Your USD Account
- Alternate Passphrase - Alternate Passphrase
Note : You Can Go To Settings(Update Profile) Menu To Get Your Alternate Passphrase.
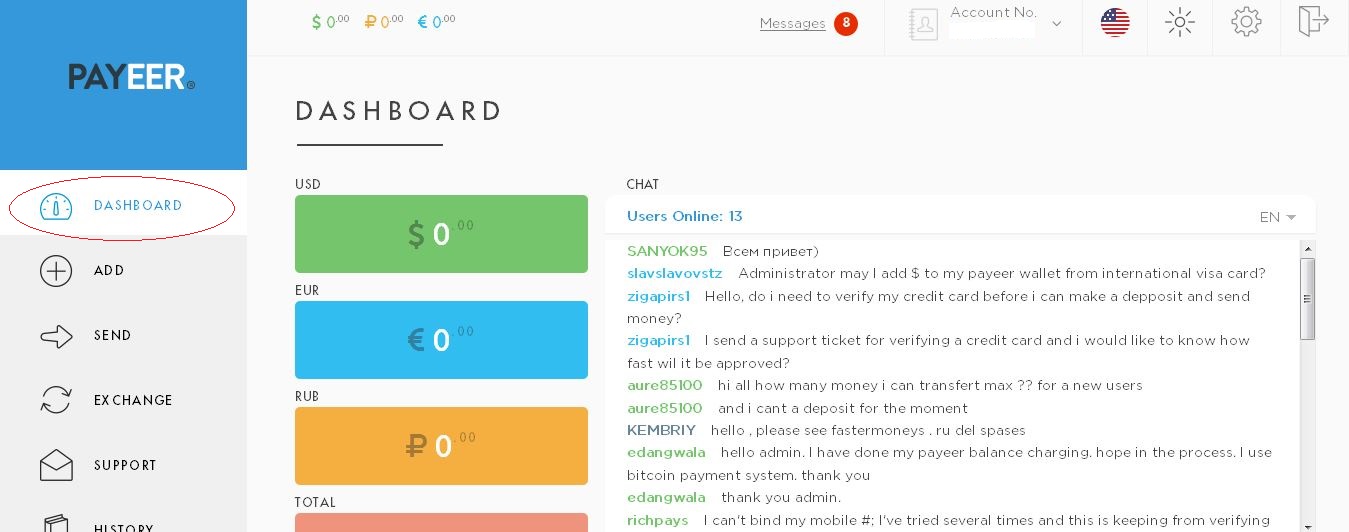
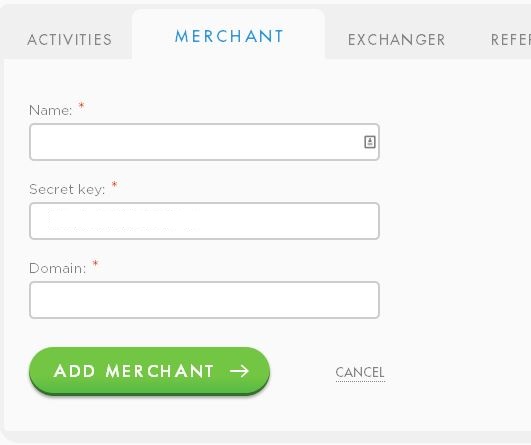
You need to create a shop(for IPN-Add Fund) and an API(for API-Masspay) in your Payeer account
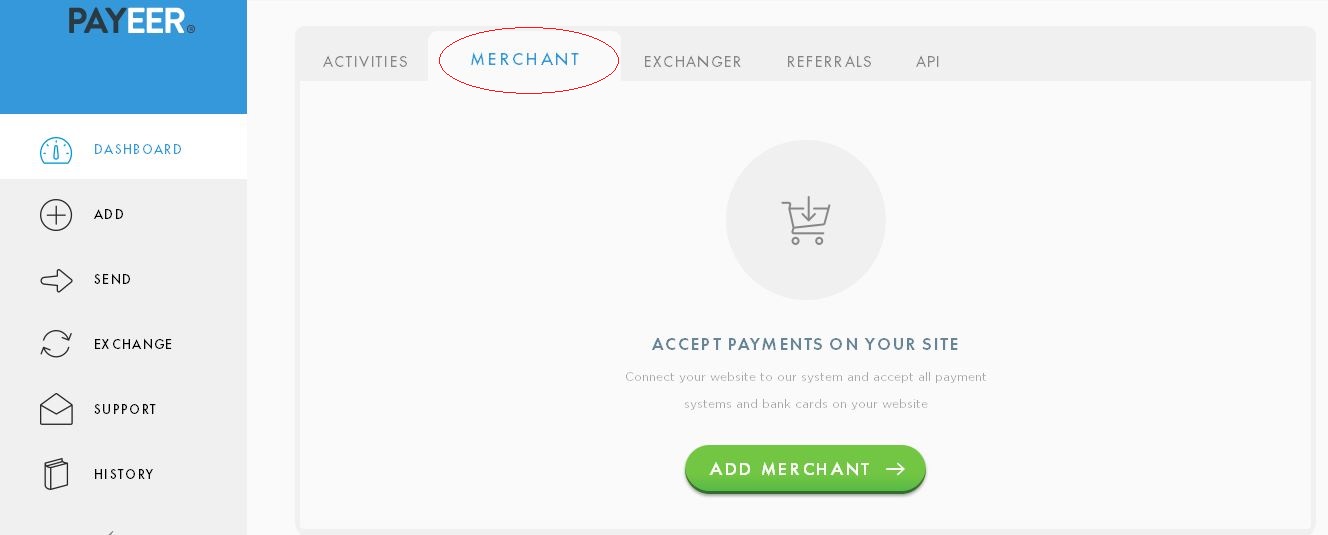
- To create a shop, just follow these steps
- Login to your Payeer account.
- Click on "Dashboard".
- Click on "Merchant".
- Click on "Add Merchant".
- Specify Your "Shop Name (Website Name)".
- Specify Your "Your Domain name".
- Note down the Secret Key
- Click on Add Merchant.
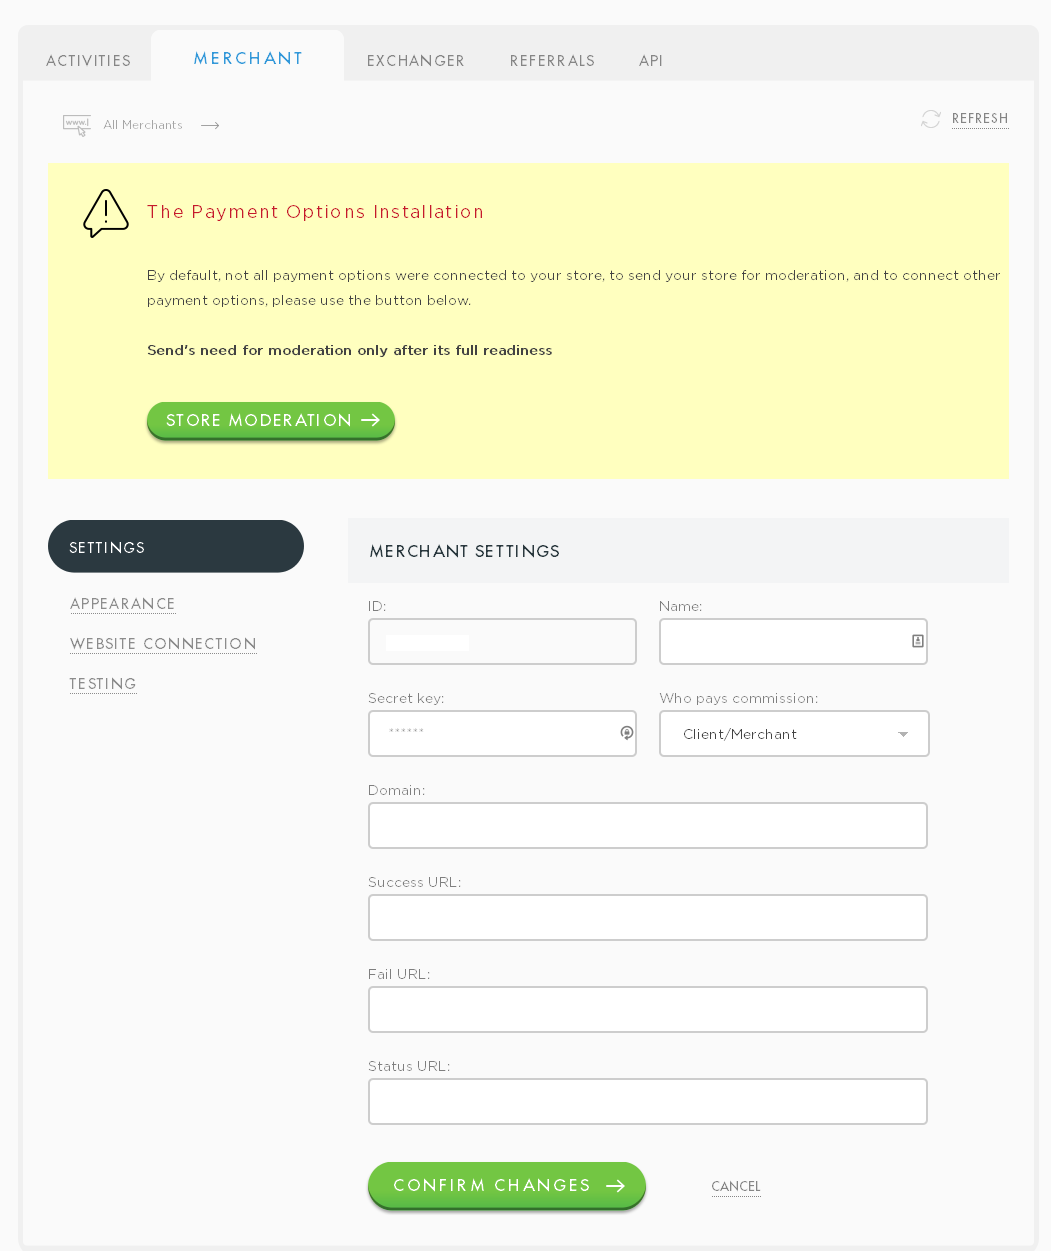
- Note down the ID (Shop ID)
- Upload FILE_NAME.txt file to /app/webroot/ directory. The FILE_NAME will be suggested by Payeer.
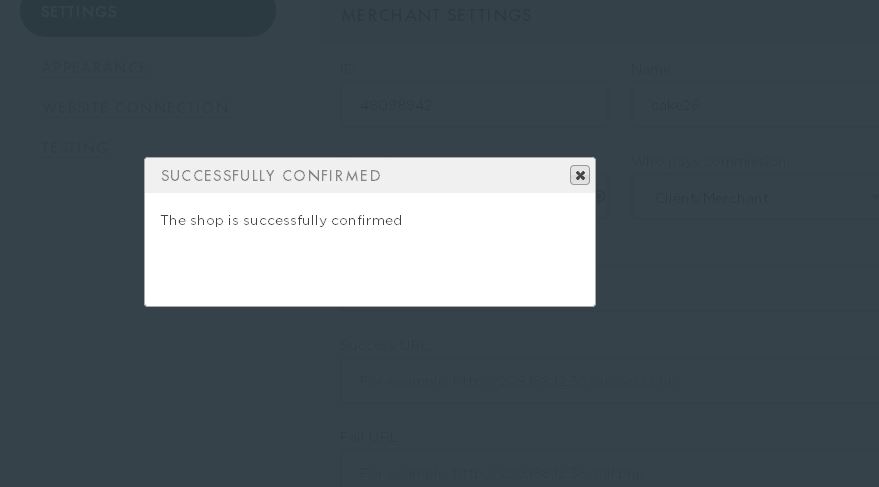
- After uploading the file, click on confirm to verify.
- Specify Success URL - [YOUR SITE URL]/thankyou/addfund/done
- Specify Fail URL - [YOUR SITE URL]/thankyou/addfund/cancel
- Specify CallBack URL - [YOUR SITE URL]/payeernotify/index
- Click on Change button.
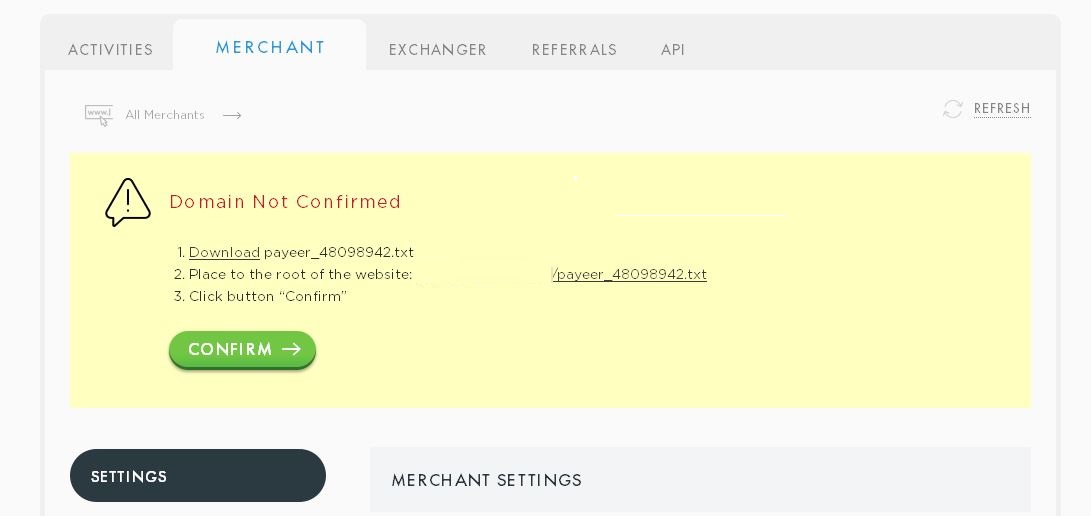
Note : After You Create Your Shop, You Need To Send The Store For Moderation. Please Make Sure To Send The Store For Moderation With Payeer By Logging Into Your Account And Select Merchant And Click On Send The Store For Moderation.
- To create an API, just follow these steps
- Login to your Payeer account.
- Click on "Dashboard".
- Click on "API".
- Click on Add User button.
- Specify "User Name".
- Specify Your IP Address.
- Click on Add button.
- Note Your ID (API ID) and API Secret Key.
- Payeer Account Details
- Specify Routine URL - http://payeer.com/api/merchant/m.php
- Specify Payeer Shop ID - Your Shop ID (ex. 121212).
- Specify Payeer Shop Secret Key - Your Shop's Secret Key.
- Specify Payeer Account Number - Your Payeer Account Number(ex. P121212).
- Specify Payeer API ID - Your Payeer API Id (ex. 121212).
- Specify Payeer API Secret Key - Your API Secret Key.
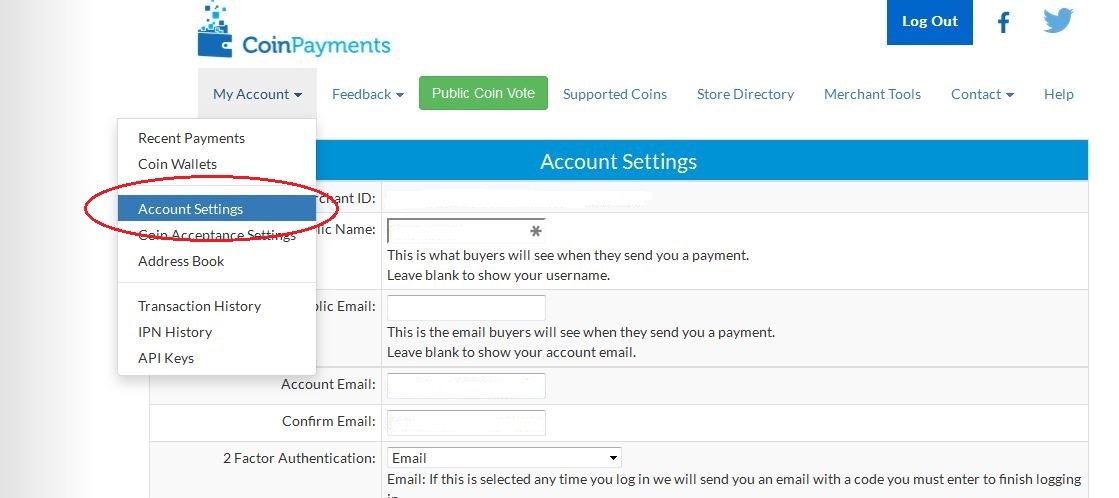
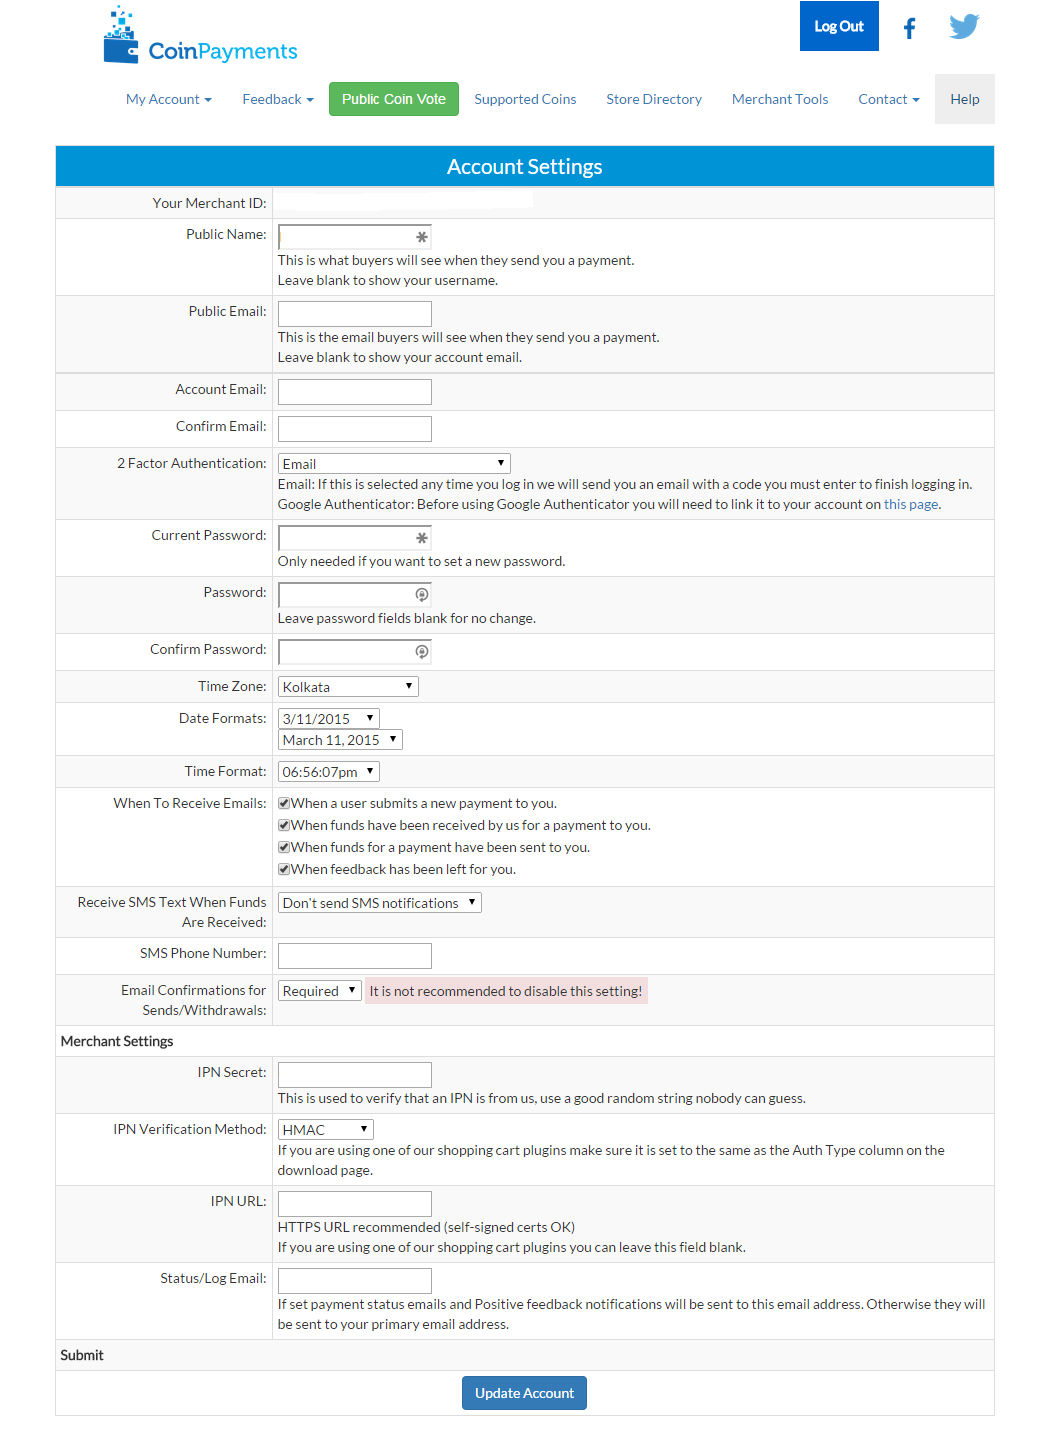
Please follow there steps in your CoinPayments account.
- Set the confirmations
- Login to your CoinPayments account.
- Click on "My Account".
- Click on "Account Settings".
- Specify "IPN Secret".
- Set IPN Verification Method option as HMAC.
- Specify "[YOUR SITE URL]/coinpaymentsnotify/index".
- Click on "Update Account".
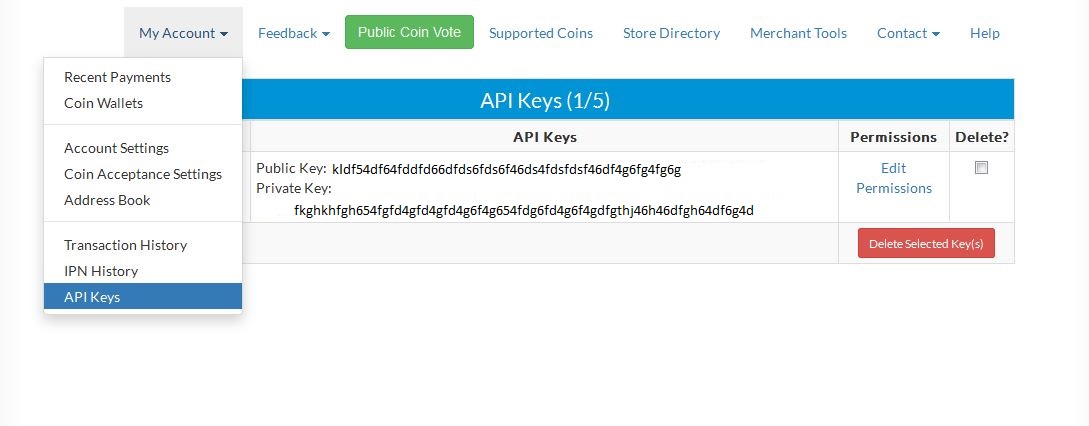
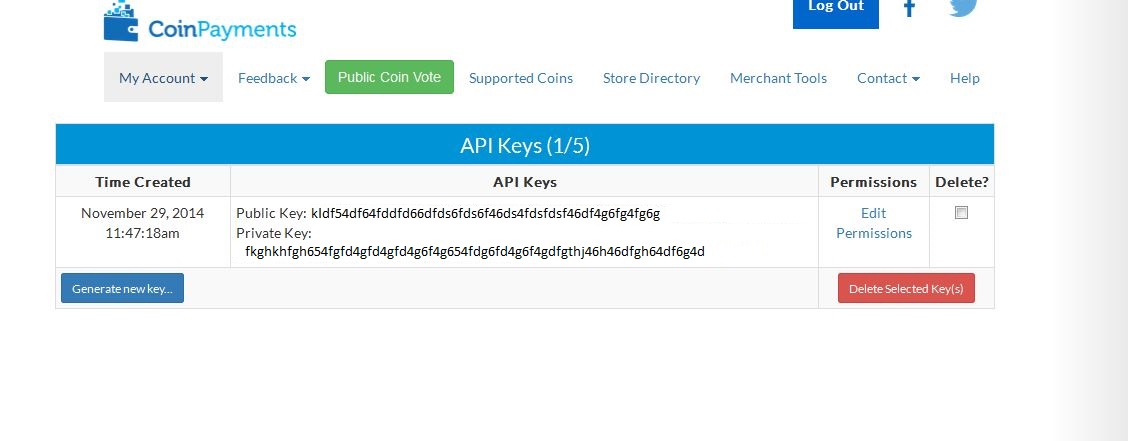
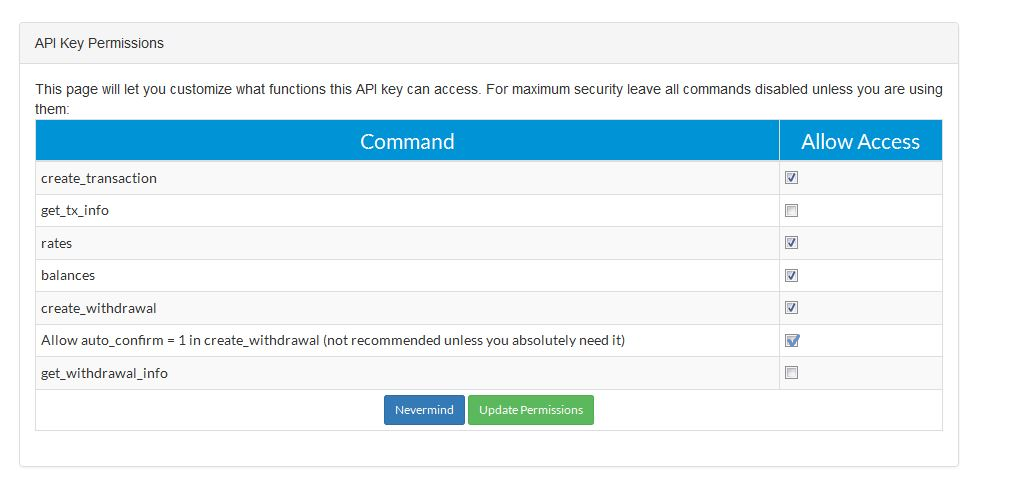
- API Settings
- Click on "My Account".
- Click on "API Keys".
- Click on "Edit Permissions".
- Allow create_transaction Command.
- Click on "Update Permissions".
- CoinPayments Merchant Account Details
- Specify Routine URL - "https://www.coinpayments.net/index.php".
- Specify Merchant ID - "Your Merchant ID (ex. ABCD12345ADDF)".
- Specify IPN Secret - "Your Coinpayments IPN Secret Key".
- Specify API Private Key - "Your Coinpayments API Private Key".
- Specify API Public Key - "Your Coinpayments API Public Key"
*Note : You Can Test PayPal Transactions By Changing The Values of Routine URL, PayPal Email, IPN Security Code and API Password As Per Your Sandbox Account.
Routine URL Should Be 'https://secure.PayPal.com/checkout' for Live Transactions.
You Need to Create an API(For Masspay) And Setup Alert URL(Necessary For Add Fund to Work) in Your PayPal Account.
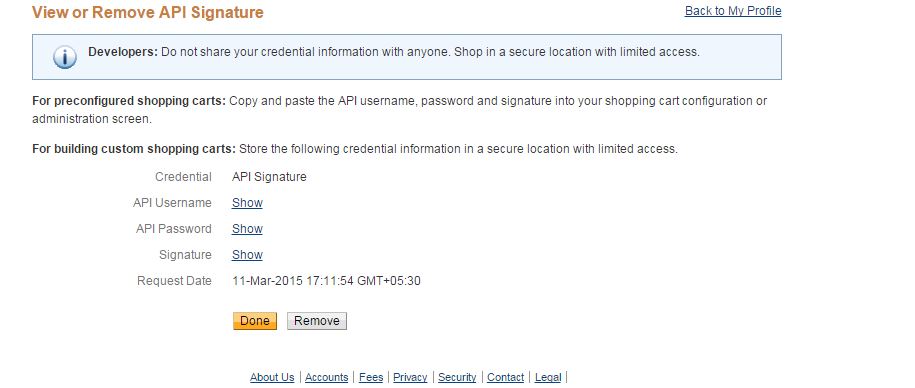
- To Create an API, just follow these steps
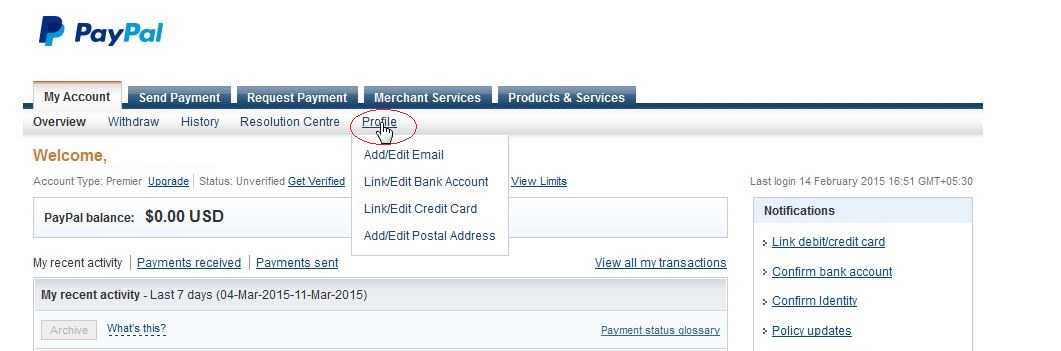
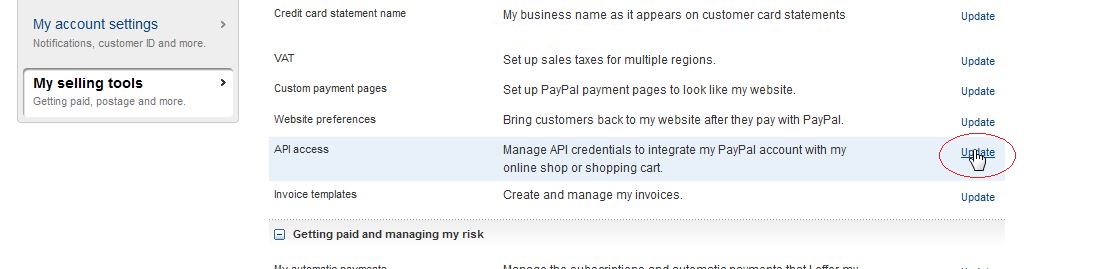
- Login to your PayPal account.
- Click on "Profile" on the My Account tab.
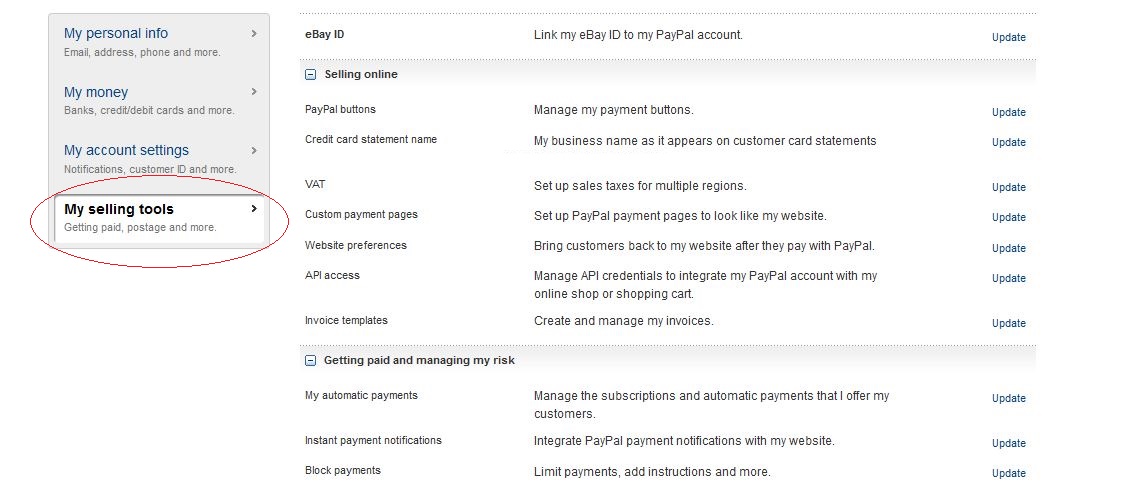
- Click on My Selling Tools
- Click on Update for API Access Option.
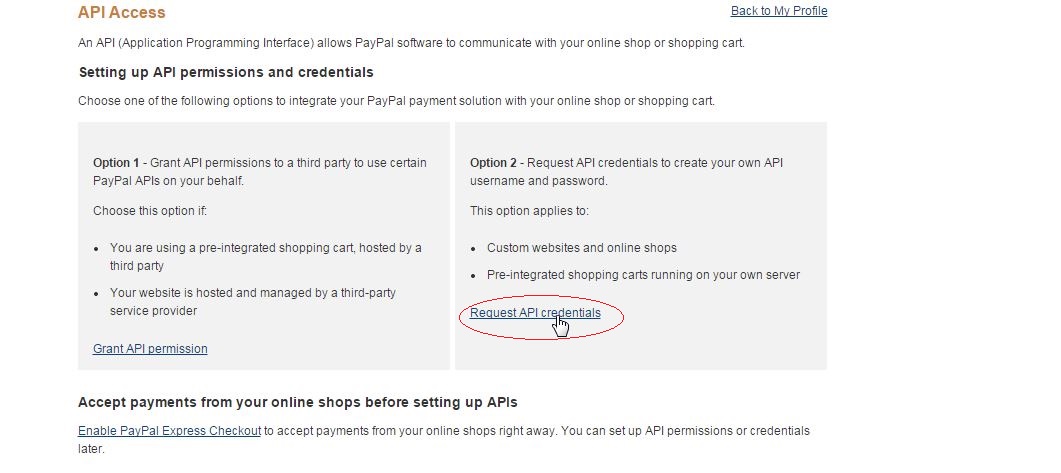
- Click on Request API Credentials.
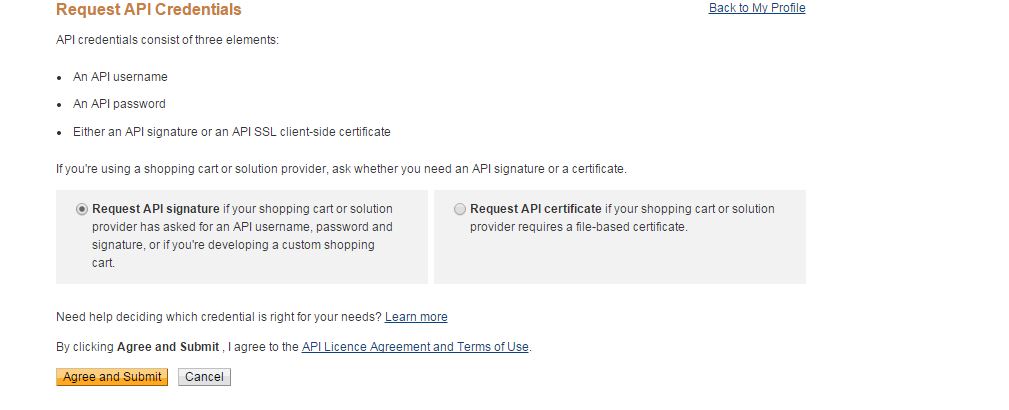
- Click on Agree and Submit Button.
- Note Down API Username, Password and Signature and Specify Them Above.
Note : Do Not Enable Test Mode As Many Changes Are Needed For Testing And Its For Developers. Restrict By IP If You Are Going Make Payment Only From One IP Address. Payment Wont Be Possible From Other IP Addresses In That Case.
- Click Done.
- Click Back to Profile to return to the Profile.
- To Setup your IPN Settings, just follow these steps
- Login to Your PayPal Account.
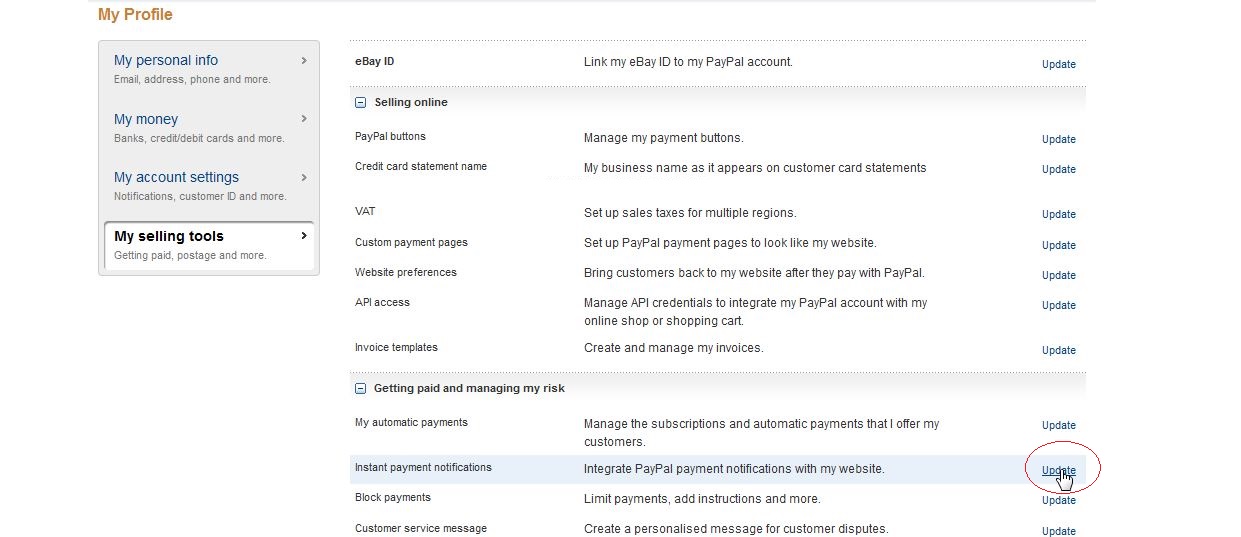
- Click on "Profile" on the My Account tab.
- Click on My Selling Tools
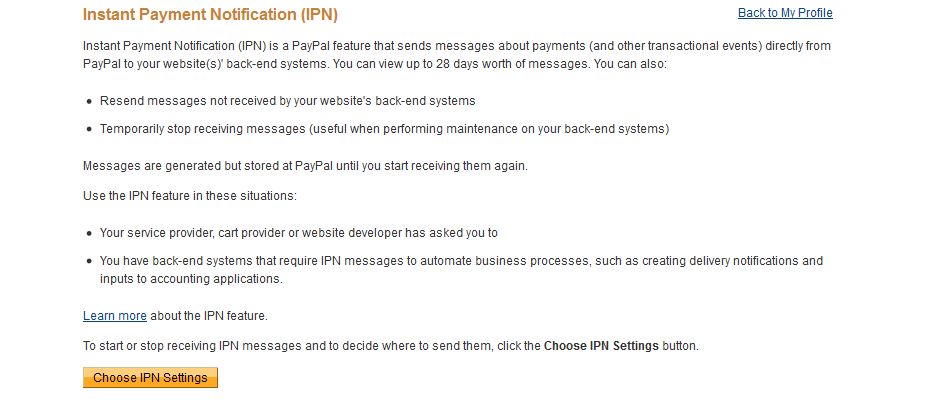
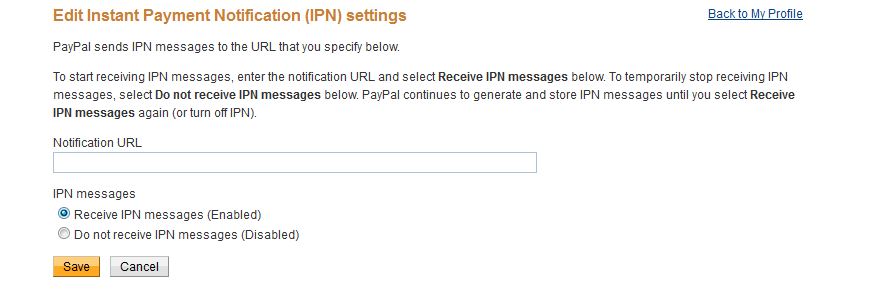
- Click on Update for Instant Payment Notification Option.
- Click Choose IPN Settings
- Specify the URL - [YOUR SITE URL]/paypalnotify/index" in the Notification URL field.
- Click Receive IPN messages (Enabled) to enable your listener
- Click Save.
Note : This is For Accounts With Multiple Business Profiles Only. Ignore This Step if You Have Only One Business Profile in Your Account.
- Click Back to Profile to return to the Profile.

Note : If You Are Having Multiple Businesses in Your PayPal Account, Your PayPal Email That You Specify Above Must Be The Email Address of The Respective Business That You Have Associated With This Website And Not Necessarily The Account Email That You Use While Logging in.
Please follow there steps in your Coinbase account.
- Set the confirmations
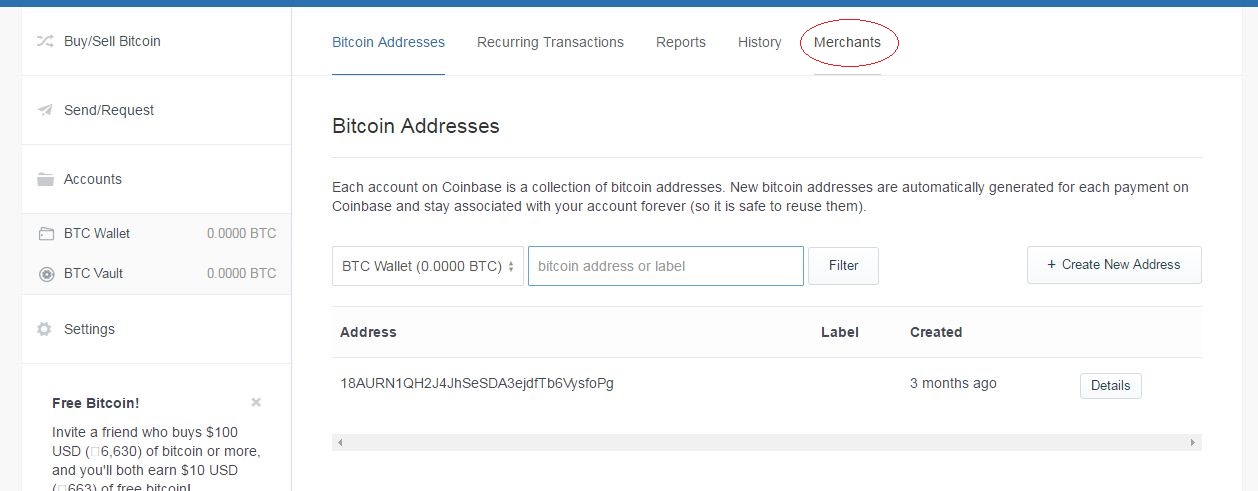
- Login to your Coinbase account.
- Click on "Advanced" on the Top Profile menu.
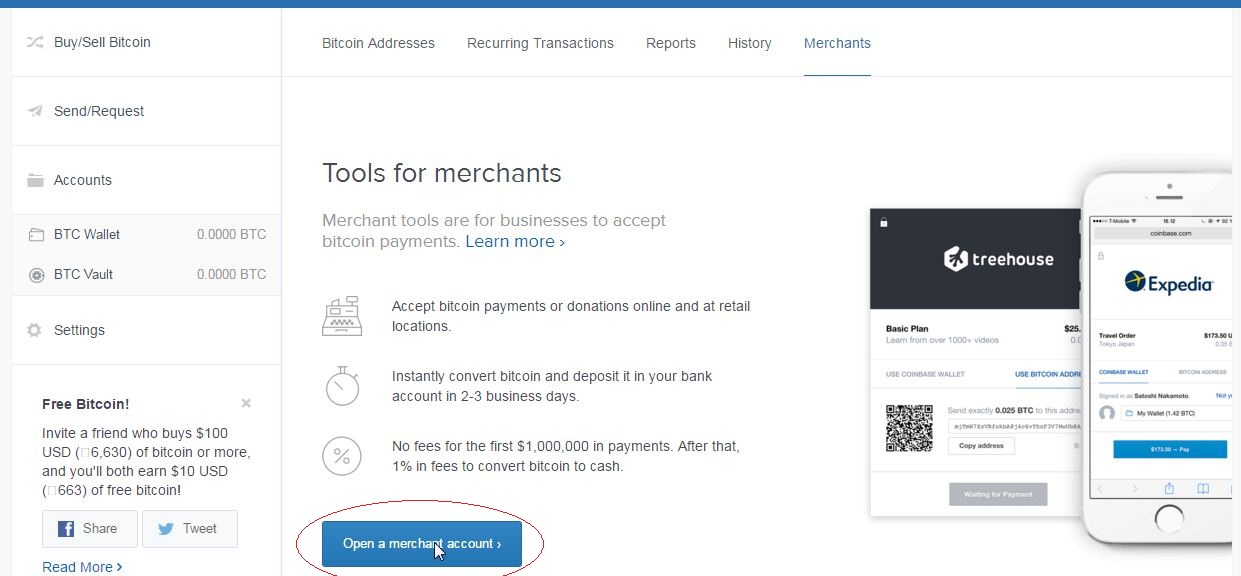
- Click on Merchant
- Click on Open a Merchant account
- Full fill all the details and complete the Profile for Merchant tools.
- Click on Save Changes

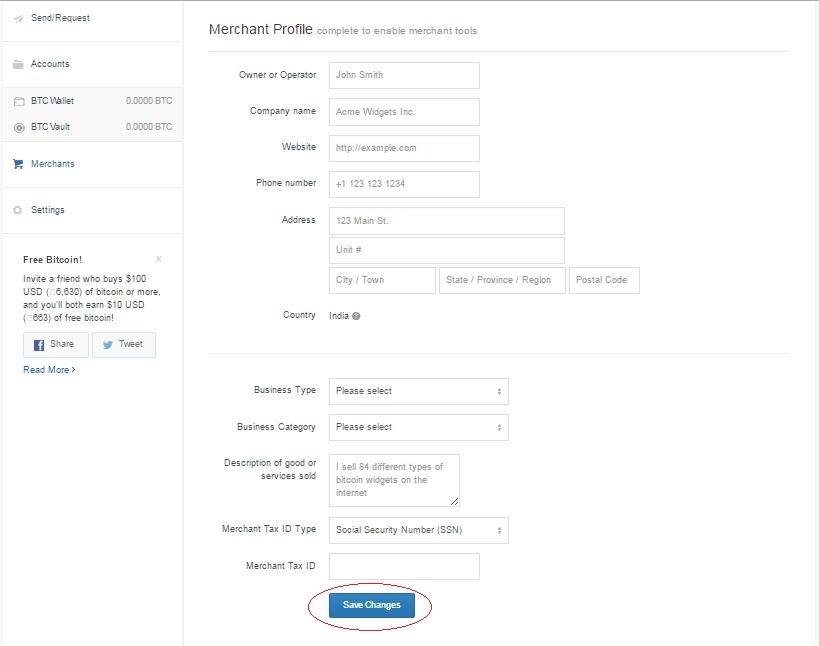
Note: Please Make Sure That Merchant Tools Are Enabled For Your Account. If You Get Message Like Merchant Tools Are Disabled Then Contact Coinbase Support.
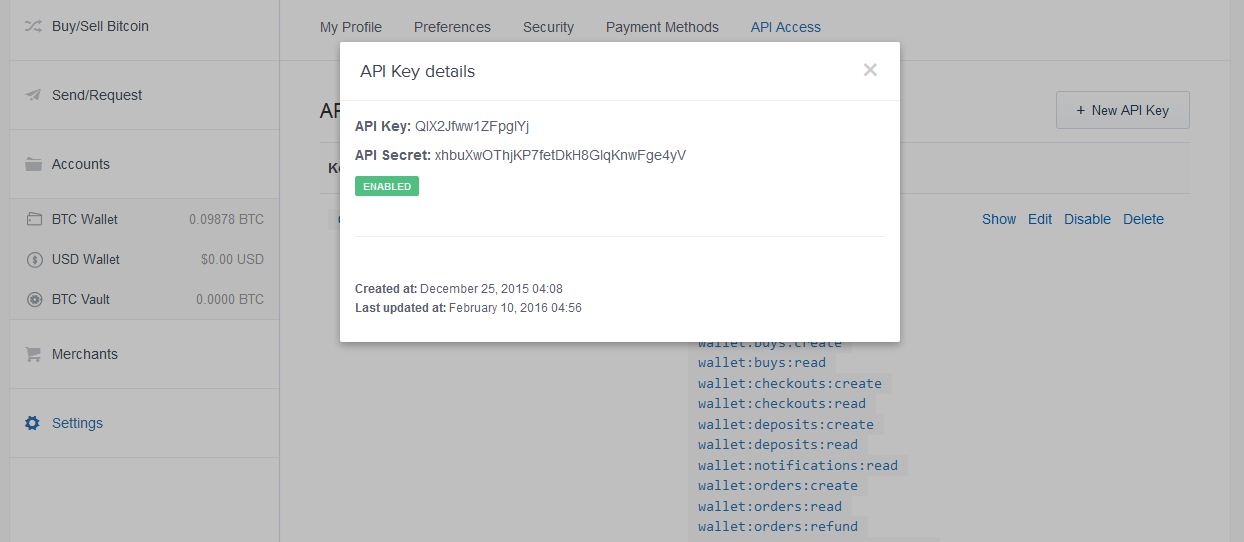
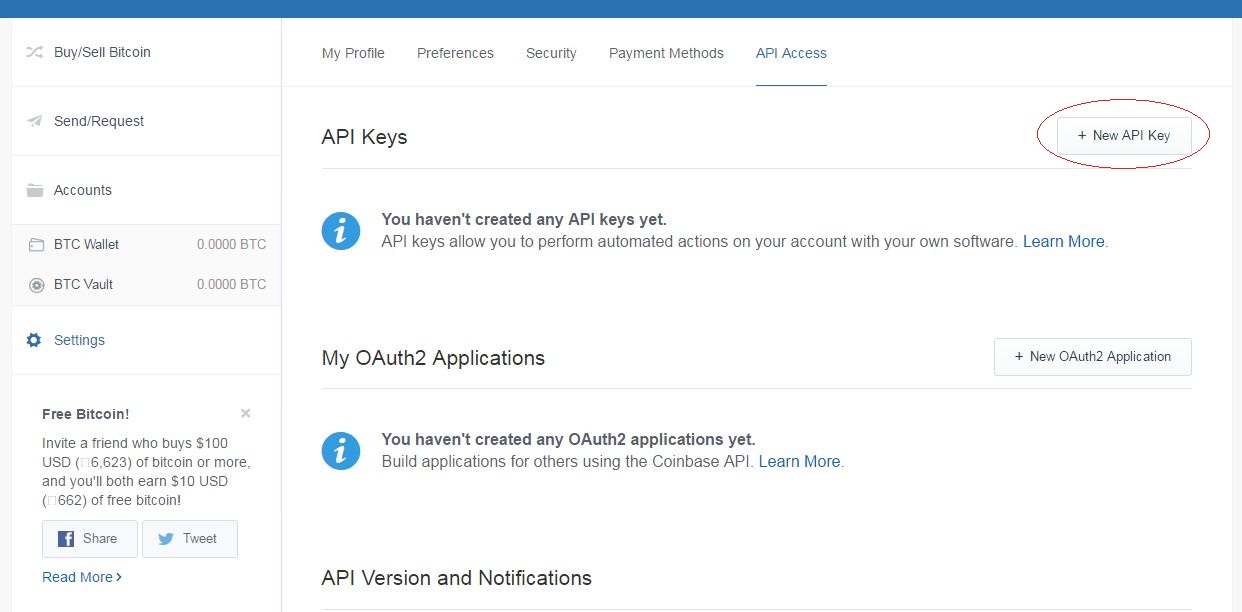
- API Settings
- Click on "Settings" On The Left Menu.
- Click on "API Access".
- Create New API Key by Clicking on "+ New API Key".
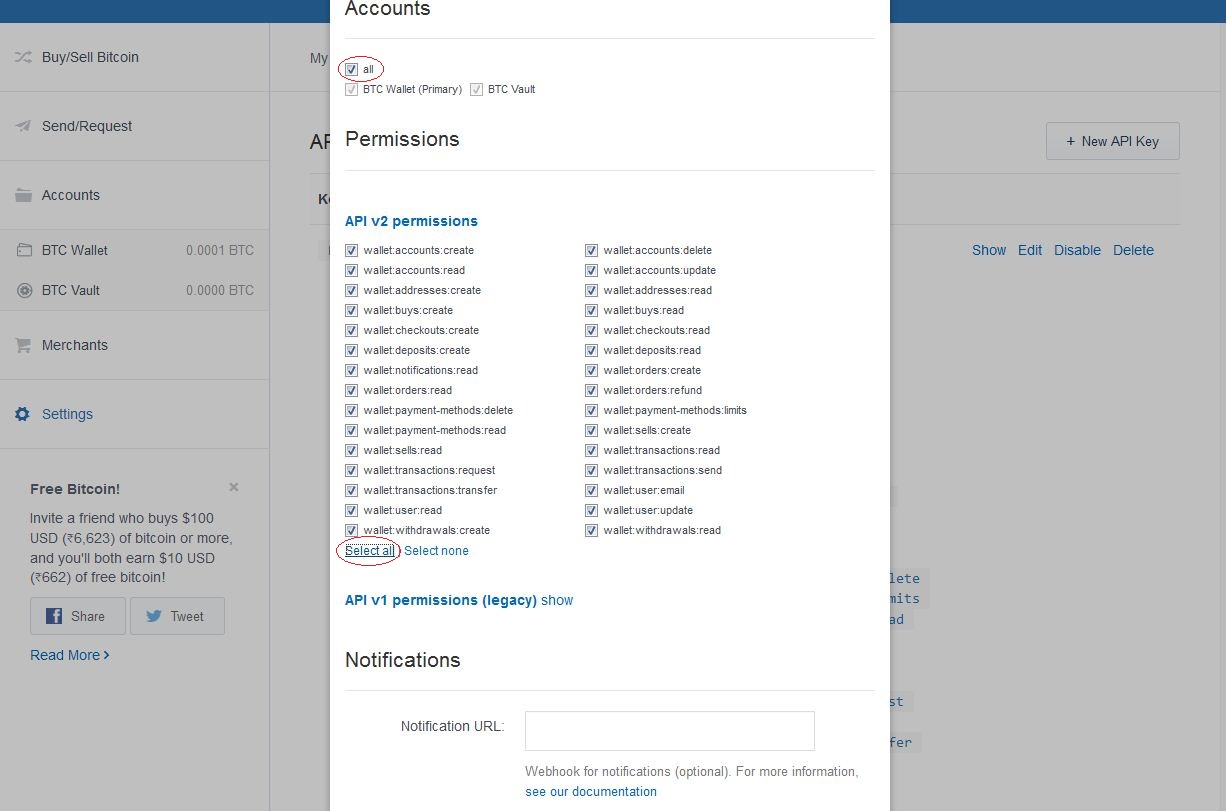
- Select Accounts to "all", And "Select all" In API V2 Permission, And Insert Notify URL And Add API Key.
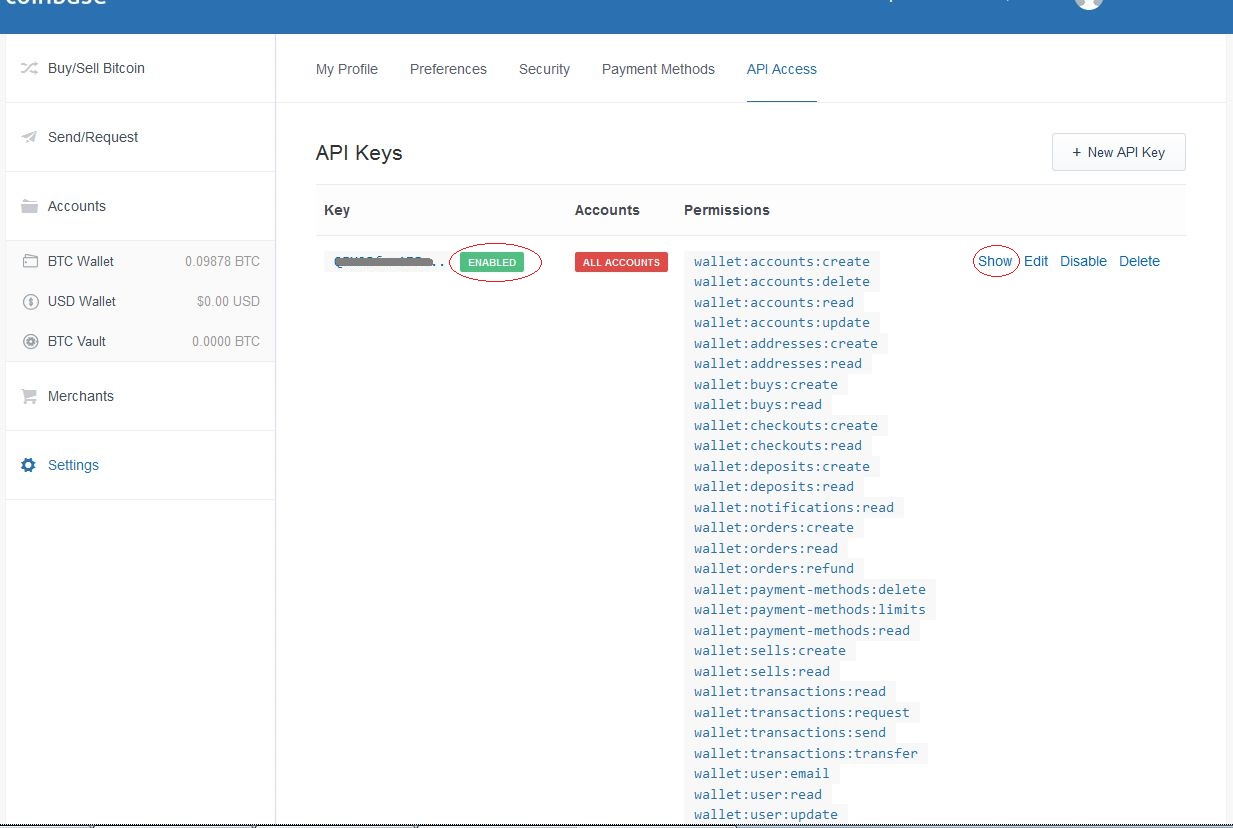
- Click on " API Key"
- Click on "Show or "Enabled".
- Note Down The API Key And API Secret Details.
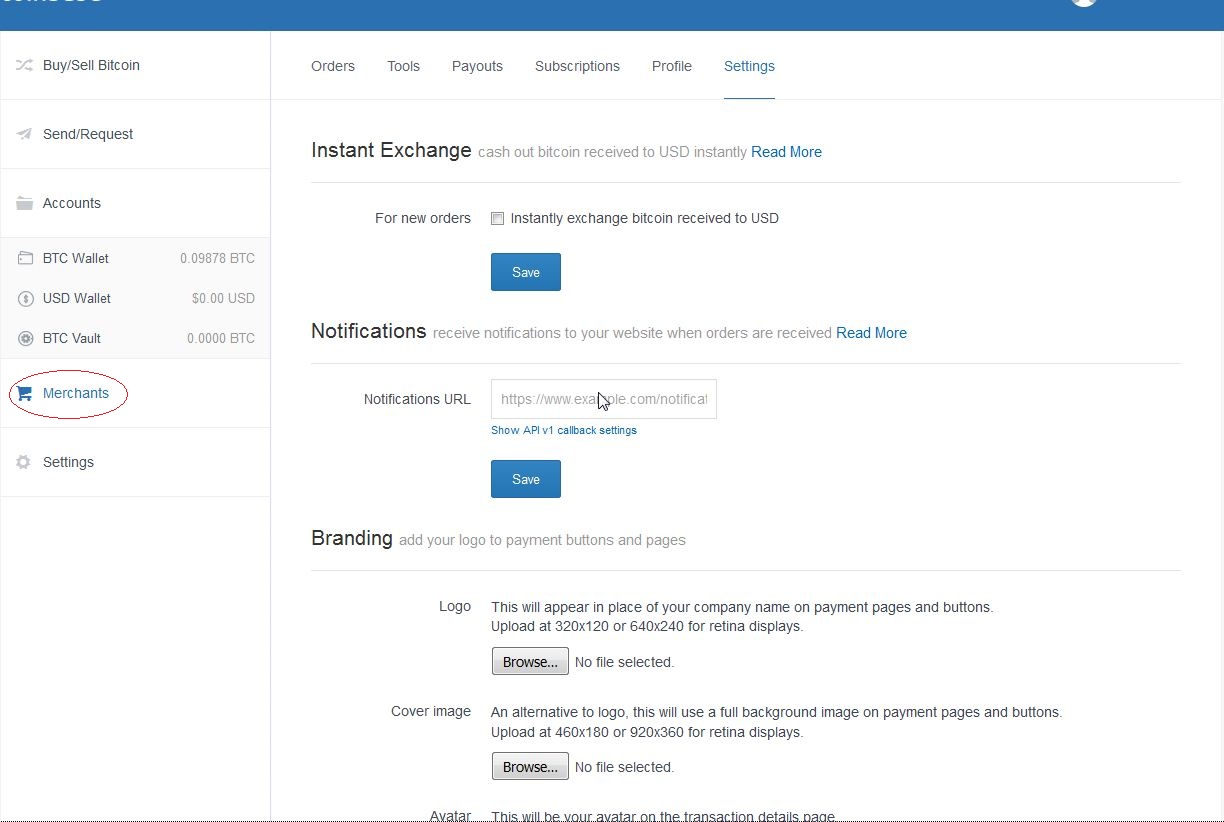
- Click on " Merchant" On The Left Menu.
- Click on " Setting".
- "Insert Notifications URL".
- Specify the URL - [YOUR SITE URL]/coinbasenotify/index" in the Notification URL field.
- Click on Save
- Coinbase Account Details
- Specify Routine URL - "https://coinbase.com/checkouts".
- Specify Merchant API Key - "Your Merchant API Key".
- Specify Merchant API Secret - "Your Merchant API Secret Key".